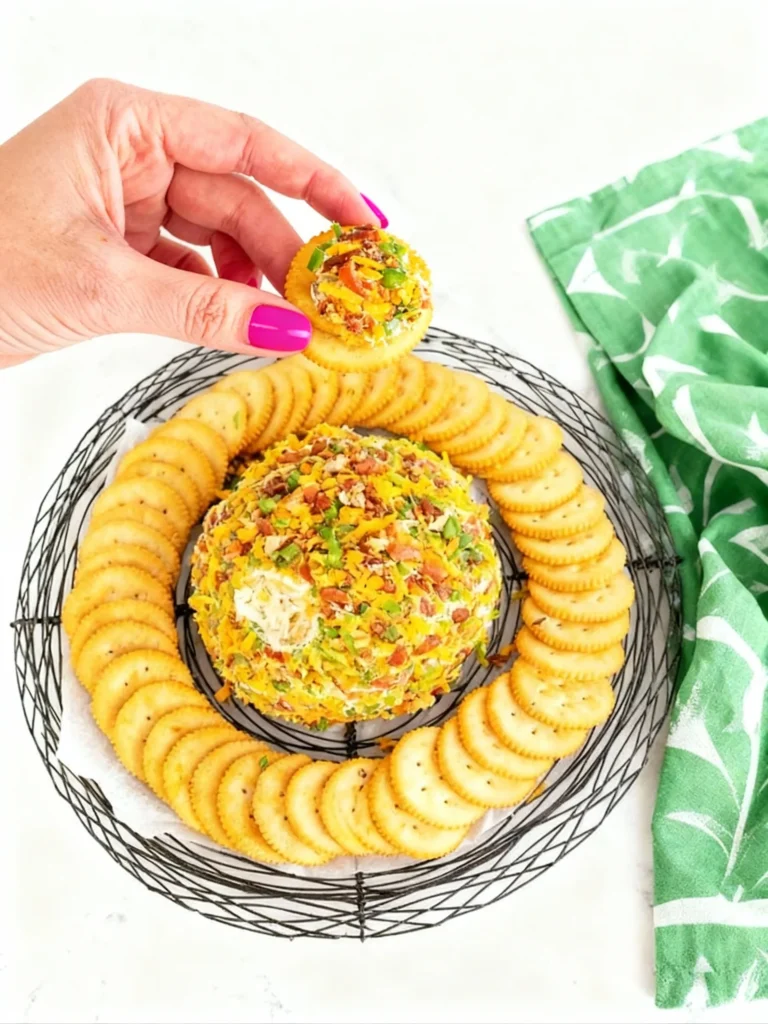
This Jalapeño Popper Cheese Ball is the perfect holiday party appetizer – think of all the spicy, creamy goodness of jalapeño poppers rolled into one big, shareable cheese ball! It’s a cozy, crowd-pleasing recipe that combines smooth cream cheese, sharp cheddar, smoky bacon, and tangy pickled jalapeños. Best of all, it’s an easy make-ahead appetizer, so you can whip it up the day before and simply pull it out when guests arrive. If you’re looking for a jalapeño popper cheese ball recipe that will be the star of your holiday spread, you’re in the right place. Let’s get started!
My family can’t get enough of this cheese ball – it’s creamy, a little spicy (but not too hot), and has big pops of flavor in every bite. I love serving it with a variety of crackers and veggies so everyone can dig in. The vibe is casual, imperfect, and totally delicious, which is exactly what I want at home gatherings. So grab a mixing bowl, and let’s make this tasty appetizer!
Why You’ll Love This Cheese Ball
- It’s an easy holiday cheese ball: This recipe uses simple ingredients and just a few steps. You can mix it up in minutes, making it an easy holiday cheese ball for Thanksgiving, Christmas, or any festive gathering.
- It’s a spicy cheese ball with bacon: Love jalapeño poppers? This delivers the same flavors in dip form. It’s a mildly spicy cheese ball with bacon – the smoked bacon, pickled jalapeños, and sharp cheddar create an irresistible savory combo that will have your guests coming back for more.
- Perfect make-ahead party appetizer: You can (and should) make this cheese ball in advance. It needs time to chill and firm up, which means it’s a great make-ahead party appetizer. Prepare it a day or two before your event, then just roll it in pecans and serve when ready.
- Fun and festive: A cheese ball is a retro classic that never goes out of style. It’s easy to transport, easy to customize, and you can even shape it into a football or pumpkin for themed parties if you want. But even just as a round ball, it looks great on a platter and makes any gathering feel a bit more special.
Ingredients
- Cream Cheese (16 ounces, softened) – The creamy base of our cheese ball. Let it sit at room temperature for 20-30 minutes so it’s soft enough to mix. Full-fat cream cheese gives the best rich flavor and texture.
- Sharp Cheddar Cheese (8 ounces, shredded) – Adds bold cheesy flavor. I recommend shredding your own cheddar from a block for the creamiest texture (pre-shredded cheese often has anti-caking powder that can make the mixture slightly drier). Sharp cheddar really stands out, but you could use a milder cheddar or even a pepper jack for extra heat.
- Bacon (4 slices, cooked crisp and crumbled) – Everything’s better with bacon! Cook the bacon until it’s nice and crispy, then crumble it into small pieces. The smoky, salty bacon bits throughout the cheese ball give that classic jalapeño popper vibe. (Tip: Fry or bake the bacon ahead of time and let it drain on paper towels to remove excess grease.)
- Pickled Jalapeños (1/4 cup, finely chopped) – These bring the jalapeño flavor and a bit of heat. Pickled jalapeños are tangy and tend to be milder than fresh jalapeños because the pickling process mellows the spice. Chop them finely so you get little bits distributed in every bite. If you’re sensitive to spice, you can reduce this amount, but remember a lot of the heat is tempered by the dairy.
- Jalapeño Pickling Juice (2 tablespoons) – The secret ingredient! A splash of the tangy pickling brine from the jalapeño jar adds moisture and a zippy flavor to the cheese mixture. It really enhances that “popper” taste. Don’t skip this – it’s a free flavor booster.
- Green Onions (1/4 cup, finely sliced) – Also known as scallions. They add a mild onion flavor and a pop of color. Use both the green and light green parts. Green onions give a bit of freshness that balances the rich cheese and bacon.
- Garlic Powder (1 teaspoon) – For a subtle garlicky depth. Garlic powder mixes evenly into the cheese. You can use 1 small clove of fresh garlic (minced) instead if you want a stronger garlic kick, but powder keeps it mellow and smooth.
- Smoked Paprika (1/2 teaspoon) – Brings a hint of smoky flavor and a nice warm color. Smoked paprika underscores the smokiness of the bacon and gives the cheese ball a subtle paprika spice. If you don’t have smoked paprika, regular paprika works too (it just won’t have the smoky element).
- Black Pepper (1/4 teaspoon) – Freshly ground black pepper for a little extra spice. 1/4 teaspoon isn’t much, but it adds a background warmth. Feel free to add more to taste if you like a peppery bite.
- Pecans (1/2 cup, finely chopped – for coating) – We’ll roll the outside of the cheese ball in chopped pecans. Pecans add a wonderful crunchy contrast to the creamy interior and a buttery, nutty flavor that complements the cheeses and bacon. You can toast the pecans for a few minutes in a dry pan to amplify their flavor if you’d like. If you’re not a fan of pecans, see the variations below for other coating ideas.
- Fresh Cilantro (2 tablespoons, chopped – for garnish) – A sprinkle of fresh cilantro on top adds color and a fresh herbal note that goes well with jalapeños. If you have cilantro haters in your crowd, you can swap this with parsley or sliced green onion for garnish, or simply leave it off. It’s mainly for presentation (and I personally love the little fresh zing it provides).
How to Make It
This cheese ball comes together with just a few easy steps. Essentially, you mix all the flavor ingredients into the cream cheese, chill the mixture so it firms up, then roll it in the coating. Here’s a step-by-step breakdown:
- Mix the cheeses and flavorings: In a large mixing bowl, add the softened cream cheese. Use a hand mixer (or a sturdy spoon and elbow grease) to beat the cream cheese until smooth and creamy. This helps avoid any lumps. Then add the shredded sharp cheddar cheese, crumbled crispy bacon, chopped pickled jalapeños, jalapeño pickling juice, sliced green onions, garlic powder, smoked paprika, and black pepper. Stir everything together very well until all the ingredients are evenly distributed. It should form a fairly uniform, thick cheese mixture. Home Cook Tip: If the cream cheese is still a bit stiff, an electric mixer makes quick work of blending. Be sure to scrape the sides of the bowl so no clumps of plain cream cheese hide out. At this point, give the mixture a little taste (if you dare!) – it will be bold, but you can check for salt. Usually the bacon and pickles provide enough salt, but you can add a pinch of salt if needed.
- Shape into a ball: Lay out a large piece of plastic wrap on your counter. Scoop all of the cheese mixture onto the center of the plastic. It will be soft and sticky. Use the plastic wrap to help you shape it – gather the corners of the wrap up over the mixture and twist them together, which will press the cheese mixture into a rough ball shape. You can gently shape and tighten the ball with your hands over the plastic wrap. Don’t worry if it’s not a perfect sphere; we’ll refine it after chilling. The goal is to get a general ball shape now. Tip: Coating your hands lightly with a bit of oil or even water can help prevent sticking if you choose to shape it directly with your hands. But generally, I find using plastic wrap keeps the mess to a minimum.
- Chill until firm: Place your bundled-up cheese ball in the refrigerator and let it chill for at least 1 hour, or until it’s firm enough to hold its shape. Longer is fine – overnight works great if you want to make it ahead. Chilling not only firms the texture but also allows all those flavors (bacon, jalapeño, spices) to meld together for a tastier cheese ball. If you’re in a rush, you can put the cheese ball in the freezer for about 15-20 minutes to speed up the firming process. Just be careful not to forget it in the freezer long-term (we’re not freezing it solid yet, just quickly chilling). You’ll know it’s ready when it feels more solid and you can unwrap it without it smushing apart.
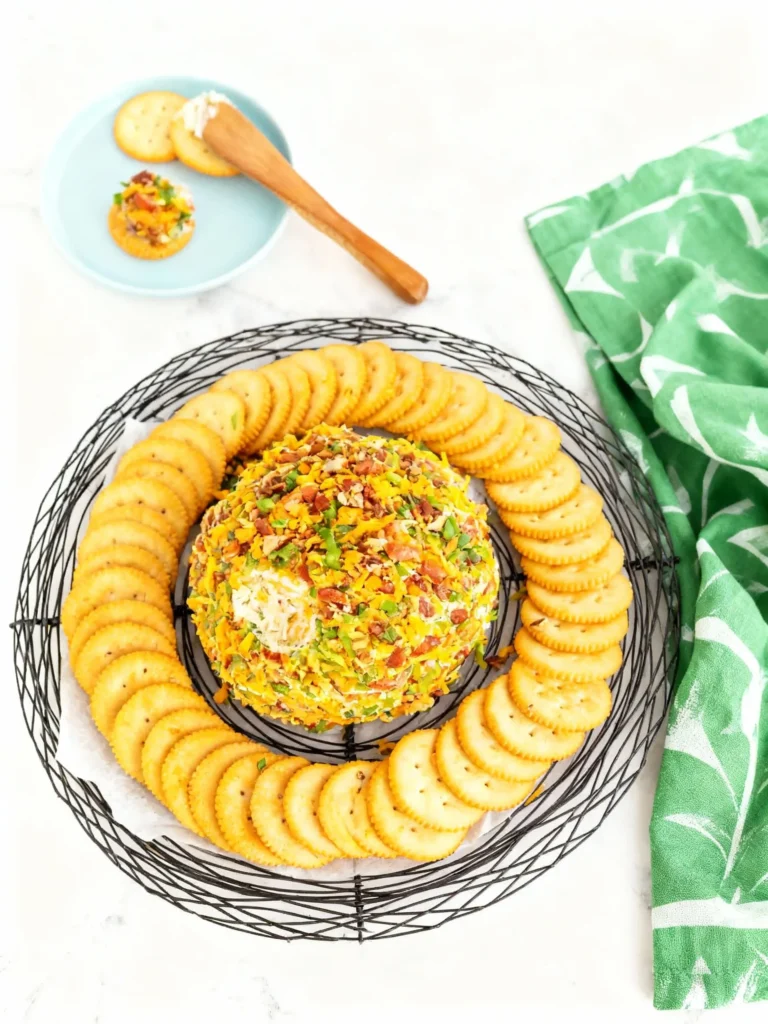
- Coat with pecans: Once the cheese ball is well-chilled and firm, it’s time to add that crunchy pecan coating. Prepare a plate or shallow dish with the finely chopped pecans spread out. Unwrap the cheese ball (it should hold its shape now) and place it on the nuts. Gently roll and press the cheese ball around in the pecans, turning to get all sides. You can use your hands to help press the pecan pieces in so they form an even coating over the entire surface. It’s okay if the coating is a little patchy; just grab some nuts and press them into any spots that need more. By the end, you should have a nice pecan-crusted ball. (At this point it looks so appetizing!) If any bits of bacon or jalapeño from inside peek through, that’s totally fine – it gives a preview of the flavors.
- Garnish and serve: Transfer your cheese ball to a serving plate or platter. For a pretty presentation, sprinkle the chopped fresh cilantro over the top of the cheese ball. It’ll stick to the pecan coating here and there. I also like to add a couple more finely chopped jalapeño bits or a little extra bacon on top as decoration (totally optional, but it hints at what’s inside). Let the cheese ball sit out for about 10-15 minutes before serving – this takes the chill off just slightly, making it perfectly spreadable. Then serve it up with an assortment of crackers, bread, or veggie sticks (see below for ideas on what to serve with it). Watch it disappear! I recommend setting out a butter knife or cheese spreader so guests can easily smear the cheese ball onto their crackers.
Substitutions and Variations
This jalapeño popper cheese ball recipe is pretty flexible. Here are some substitution ideas and variations to suit different tastes or dietary needs:
- Fresh Jalapeños: If you don’t have pickled jalapeños, you can use fresh jalapeño peppers instead. Use 1-2 fresh jalapeños (seeds removed for less heat, or keep some seeds for extra kick), finely minced. Keep in mind fresh jalapeños will be a bit spicier and crunchier than pickled. Pickled jalapeños are milder because the capsaicin (heat compound) leaches into the brine, so fresh will give you a more pronounced heat. You might also add a squeeze of lime juice (about 2 teaspoons) in place of the pickling juice, to add back some tang.
- Cheese Variety: Feel free to mix up the cheeses. Pepper jack cheese can replace some or all of the cheddar for an extra peppery twist. Colby-Jack or a Mexican blend would work in a pinch too. Even a little grated Parmesan or smoked gouda mixed in could add a fun flavor note. As long as you have about 2 cups of shredded cheese total, the cheese ball will hold together. Just avoid very soft cheeses (like blue cheese or feta crumbles) in the mix, as they can affect the texture.
- Make it Without Bacon: Want a vegetarian cheese ball (or don’t have bacon on hand)? You can simply omit the bacon – it will still be delicious and flavorful from the jalapeños, cheddar, and spices. To add a little smoky depth in place of bacon, increase the smoked paprika to 1 teaspoon or add 1/2 teaspoon of liquid smoke to the mix. You could also mix in some chopped smoked almonds or smoked cheese as a bacon substitute for texture and flavor.
- Coating Alternatives: Not a fan of pecans or have a nut allergy? No problem. You can roll the cheese ball in many other tasty things. Try crushed buttery crackers (like Ritz) or crushed pretzels for a salty crunch. Crumbled bacon pieces can be used to coat the outside as well (you might need a few extra slices of bacon, cooked and chopped finely). Another idea: chopped fresh parsley or chives mixed with crushed nuts or seeds (sunflower seeds are a good nut-free option) to add green color and flavor. Even shredded cheddar or a mix of cheddar and jalapeño bits can be pressed onto the outside for a brightly colored “loaded” cheese ball look.
- Sour Cream Addition: For an even creamier, softer texture, you can mix in 1/4 cup of sour cream (or Greek yogurt) into the cheese mixture. Some recipes use sour cream to lighten the consistency. If you do this, note that the cheese ball will be softer and you’ll definitely need to chill it longer to firm up. It also means the cheese ball won’t hold its shape as long at room temp, but it adds a nice tangy creaminess. Only add sour cream if you don’t mind a slightly softer ball.
- Ranch Flavor Variation: Love ranch flavor with your jalapeño poppers? Stir in a tablespoon of dry ranch seasoning mix into the cheese mixture. The herbs and spices in ranch seasoning (dill, garlic, onion, etc.) can complement the jalapeño and bacon nicely, turning this into a “Jalapeño Popper Ranch Cheese Ball.” If you do add ranch mix, you might reduce the added salt (if any) since the mix contains salt.
- Shaping Ideas: While a classic round cheese ball is always impressive, you can have fun with shapes. For example, shape it into a football for game day (then you can use thin strips of cheese or sliced almonds to make the laces on top!). Or shape it into a pumpkin for a fall theme – roll it in crushed Doritos or cheddar cheese to get an orange color, and stick a pretzel rod on top as a “stem.” Mini Cheese Balls are another great variation: divide the mixture into bite-sized portions and roll each in the coating to make cheese ball “bites” – perfect for individual servings with pretzel sticks inserted as handles. The possibilities are endless, so feel free to get creative with how you present it!
Tips for Success
- Start with really soft cream cheese: It’s much easier to mix everything when the cream cheese is completely softened. If it’s too firm, you might end up with lumps or have a hard time stirring in the other ingredients. For a quick softening trick, cut the cream cheese into cubes and let sit at room temp for about 20 minutes. In a pinch, you can microwave an unwrapped block for 10-second intervals (just until soft, not melted).
- Shred your own cheddar: I know the convenience of bagged pre-shredded cheese is tempting, but freshly shredded cheese really does make a difference here. Pre-shredded cheeses are coated with anti-caking agents that can prevent them from melting smoothly. Since we want a creamy texture, shredding a block of cheddar will yield a creamier cheese ball (and better flavor too!). It only takes a minute and is worth it for this recipe.
- Cook the bacon until crispy: Make sure your bacon is nice and crisp before crumbling it into the mixture. Limp or chewy bacon won’t distribute as well and can get soggy inside the cheese ball. Crispy bacon, on the other hand, will stay crunchy for a bit and gives little bursts of smoky flavor throughout. After cooking, blot excess grease off the bacon with a paper towel so the cheese ball mixture doesn’t get too oily.
- Taste and adjust (before chilling): Once everything is mixed (before you shape and chill it), give the mixture a taste. It will be intense eaten straight (since it’s concentrated and not on a cracker yet), but you can gauge the seasoning. Now’s the time to add a pinch of salt, more pepper, or an extra dash of garlic powder if you think it needs it. If you want it spicier, you could even mix in a pinch of cayenne or some red pepper flakes. Just remember the flavors will mellow slightly after chilling and when eaten with a bland cracker.
- Chill for at least an hour (or more): Don’t shortcut the chill time too much. The cheese ball needs time to firm up so it can hold its shape and be rolled in the coating without smearing. An hour is the minimum, but if you have 2 hours or overnight, even better. You can make the cheese mixture in the morning or the day before, wrap it tightly, and keep it in the fridge until party time. The flavors will only get better. (If making more than 24 hours ahead, I like to wait to do the pecan coating until closer to serving so the nuts stay their crunchiest.)
- Roll it while cold: Coat the cheese ball in the pecans immediately after taking it out of the fridge (or after the quick freezer chill). If it starts to warm up, it can get messy to roll as the cheese softens. If you find it’s sticking to your hands while coating, pop it back in the fridge or freezer for a few minutes. You can also wear food-safe gloves to keep your hands clean during the rolling process.
- Toast the pecans for extra flavor: This is optional, but toasting the chopped pecans in a dry skillet over medium heat for about 3-4 minutes until fragrant can really enhance their nutty flavor and crunch. Just let them cool before you roll the cheese ball in them. Toasted pecans + bacon + cheddar = flavor heaven.
- Serving temperature: A common mistake is serving a cheese ball ice-cold. Extremely cold cheese can taste bland and be hard to spread. On the flip side, you don’t want it sitting out too long and turning too soft. The sweet spot is to let the prepared cheese ball sit at room temp for about 10-15 minutes before serving. It will be creamy and spreadable, but still hold its shape. (And as noted in storage tips, for food safety, don’t leave it out for more than a couple hours.)
Storage + Make Ahead
- Make-Ahead: This jalapeño popper cheese ball is an awesome make-ahead appetizer. You can prepare the cheese mixture and form the ball (wrap it tightly in plastic wrap) and store it in the refrigerator for 1-2 days before your event. In fact, you can make it up to about 4 days in advance as long as you wait to add the pecan coating until shortly before serving. I recommend storing the chopped pecans separately and coating the cheese ball right before you serve (this keeps the nuts from getting soft). The flavors will deepen as it sits, which is great!
- Storage: If you have leftovers (hey, it could happen!), wrap the cheese ball tightly in plastic wrap or place it in an airtight container. It will keep in the refrigerator for up to about 4 days. Because it contains dairy and cooked bacon, always refrigerate it when not in use. Pro tip: If the outside coating has gotten soft or moist after sitting out, you can press on a fresh handful of chopped pecans or even crisp bacon bits after refrigerating, to refresh the exterior crunch for the next day.
- How Long Can It Sit Out? When serving, try not to leave the cheese ball at room temperature for more than 2 hours for food safety reasons. Dairy-based appetizers like this can start to grow bacteria if left out too long. If your party lasts longer, consider splitting the cheese ball in half: set out one half first, and leave the other half in the fridge. Refill with the chilled half after the first one is devoured (which it will be!). This way nothing stays out for too long and everything stays fresh.
- Freezing: Yes, you can freeze a cheese ball! If you want to make it further ahead than a few days, wrap the un-coated cheese ball tightly in a layer of plastic wrap and then aluminum foil (to prevent freezer burn). It can be frozen for up to 1 month and still taste great (some sources even say up to 3 months, but for best flavor I stick to 4 weeks max). When ready to use, thaw it overnight in the refrigerator. Once it’s thawed and just before serving, roll it in freshly chopped pecans as directed. Freezing can sometimes change the texture of the nuts and fresh herbs, so it’s better to add those later. One more tip: label it with the date in your freezer so you don’t forget what it is or how long it’s been in there.
FAQ
Can I use fresh jalapeños instead of pickled?
Yes, you can use fresh jalapeños if you prefer. Use one or two fresh jalapeño peppers, remove the seeds and ribs (for less heat), and mince them finely. Fresh jalapeños will give more crunch and a sharper heat compared to pickled. Remember, pickled jalapeños are milder than fresh because some of the capsaicin (heat) is reduced by the pickling process. Also, if using fresh, you won’t have the pickling juice to add – you can substitute a tablespoon of lime juice or even a bit of vinegar to maintain a touch of tangy flavor. Both versions are delicious, but the classic “popper” flavor usually has that vinegary pickle note, which is why I love using jarred jalapeños here.
Is this cheese ball very spicy?
It has a gentle kick, but it’s not overwhelmingly spicy. The heat level is moderate because we’re using pickled jalapeños (which are relatively mild) and a fair amount of creamy dairy to balance them out. Most people find it just right – a little zippy, but still family-friendly. If you are particularly sensitive to spice, you can reduce the jalapeños to 2-3 tablespoons or use milder pickled banana peppers instead. On the other hand, if you want to amp up the spice, add an extra spoonful of jalapeños or even a diced fresh jalapeño. You could also mix in a pinch of cayenne pepper or serve red pepper flakes on the side for those who want more heat.
What can I use instead of cilantro for garnish?
If you’re not a cilantro fan (I know it tastes like soap to some folks!), simply leave it out or swap it with another herb. Chopped fresh parsley is the best neutral substitute – it will add a nice green color without strong flavor. Sliced green onion tops would also work well as a garnish to give a pop of color and a mild onion flavor. Another idea: finely diced red bell pepper or pimentos can add a festive red-green look on top for the holidays, no herbs needed. The garnish is totally flexible, so use what you like (or nothing at all – the cheese ball will still look appetizing with that pecan coating).
How long will the cheese ball last in the fridge?
When properly stored (wrapped tightly or in a sealed container), your jalapeño popper cheese ball will last about 3 to 4 days refrigerated. After a few days, the texture might start to change a bit (the nuts could soften, and the green onions might not be as perky), so it’s best enjoyed within that timeframe. If you’re prepping it for an event, I’d suggest making it no more than 1-2 days ahead for optimum taste and texture. Always keep it chilled when not serving.
Can I freeze the cheese ball?
Yes – cheese balls generally freeze well. To freeze, wrap the assembled cheese mixture (before rolling in pecans) very tightly in plastic wrap and then in foil. Freeze for up to about 4 weeks for best quality. Thaw it overnight in the refrigerator before serving. I recommend waiting to add the pecan coating until after thawing. You can freeze it with the nuts on, but the nuts will lose some crunch and could taste a tad stale. It’s super easy to roll it in fresh pecans once it’s thawed. One thing to note: freezing can sometimes make the cheese ball slightly softer or crumbly when thawed, but because this recipe has a good amount of fat from the cheese and bacon, it holds up well. I’ve done it and the difference is minimal.
What should I serve with this jalapeño popper cheese ball?
You’ve got lots of options! I like to surround the cheese ball with an assortment of dippers so everyone can find something they enjoy. Classic butter crackers (like Ritz) and crispy saltine crackers are a given. Sturdy crackers such as wheat crackers or multigrain crackers work great too. Pretzel chips or pretzel sticks are fantastic with this cheese ball – that extra salty crunch is perfect. For a something bolder, serve it with crunchy pita chips or bagel chips. If you want to add some freshness to the spread, include veggie dippers: celery sticks, carrot sticks, cucumber slices, and bell pepper strips all pair nicely and add a refreshing crunch between indulgent bites. Even slices of toasted baguette (crostini) can be used to smear on the cheese ball. Basically, any vessel that can hold some creamy, cheesy goodness is fair game! Usually, I set out a mix of crackers, pretzels, and veggies to cover all the bases.
Any other tips for making the cheese ball a hit?
One tip is to let the cheese ball soften just slightly before serving (about 10 minutes on the counter) so that it’s easy for guests to spread. Also, put out a cheese spreader or butter knife specifically for the cheese ball – that way people aren’t digging at it with their crackers (which can get messy and double-dippy). Another idea: if serving for a longer period, consider splitting the cheese ball onto two plates and replenish with the second half partway through the party (this also keeps the cheese ball looking neat; the first one can get a bit smeared after many attacks!). Lastly, have fun with it – the casual, homemade look of a cheese ball is part of its charm. It’s not meant to be fussy or perfect. Enjoy the process and enjoy the compliments from your guests!
What to Serve with It
This cheese ball pairs well with all sorts of dippers. Here are some serving ideas to create a beautiful and tasty appetizer platter:
- Crackers: An assortment of crackers is always a winner. Buttery round crackers, whole-grain crackers, club crackers, or any of your favorite variety. The creamy, spicy cheese spread on a crunchy cracker is a classic combo.
- Pretzels: Pretzel crisps or pretzel rods add a salty crunch that goes perfectly with the cheesy spread. Plus, pretzel sticks can be used to scoop a bit of the cheese ball without even needing a knife.
- Bread and Crostini: Thin slices of toasted baguette (crostini) or pita chips are great if you want a sturdier base. The neutral bread lets the flavors of the cheese ball shine. You can also serve soft bread slices on the side, though typically something with crunch is preferred for texture contrast.
- Veggie Sticks: For a fresh, lighter option, include some veggies. Celery sticks, carrot sticks, cucumber rounds, and bell pepper strips are all wonderful for dipping or spreading with cheese ball. The cool crisp vegetables are a nice balance to the richness of the cheese ball (and guests who are keto or gluten-free will appreciate the veggie option!).
- Extra Jalapeños: This is more of a garnish, but I sometimes set out a few extra pickled jalapeño slices or fresh jalapeño rings on the side for those who want an extra bite of heat on top of their spread. It looks nice on the platter too.
Arrange your chosen dippers around the cheese ball on a platter or cutting board. It makes for a pretty presentation and invites people to dig in. Don’t forget small plates and napkins nearby – once folks start spreading this on their crackers, it’ll go fast!
More Holiday Appetizer Recipes
- Baked Brie with Jam and Pistachios – A melty baked brie wheel topped with sweet jam and crunchy nuts, always a hit at holiday gatherings (and it only takes 10 minutes to prep!).
- Creamy Baked Jalapeño Popper Dip – All the spicy, cheesy flavor of jalapeño poppers in a warm, bubbly dip form. This one is great for those who love a hot dip option alongside a cheese ball.
- Spinach Artichoke Dip – A classic party favorite featuring creamy cheese, spinach, and artichokes. It’s deliciously cheesy and perfect for bread or crackers.
- Slow Cooker Sweet and Sour Meatballs – Tender crockpot meatballs simmered in a tangy sweet & sour sauce. An easy make-ahead appetizer that’s ideal for holidays or game days.
Use Your Leftovers
Reduce food waste by making these recipes with your leftover ingredients:


Quick & Easy Jalapeño Popper Cheese Ball Recipe
Description
A creamy, spicy, and utterly addictive cheese ball that captures all the flavors of classic jalapeno poppers in a shareable appetizer.
Ingredients
Instructions
-
In a large mixing bowl, combine the softened cream cheese and shredded cheddar cheese until well blended.
-
Add the crumbled bacon, chopped jalapenos, jalapeno juice, green onions, garlic powder, smoked paprika, and black pepper. Mix thoroughly.
-
Lay a large piece of plastic wrap on the counter. Scoop the cheese mixture onto the center.
-
Use the plastic wrap to help you shape the mixture into a tight ball. Twist the wrap to secure it.
-
Refrigerate the cheese ball for at least 2 hours, or until firm.
-
Place the chopped pecans on a plate or shallow dish.
-
Unwrap the chilled cheese ball and roll it in the pecans, pressing gently to adhere.
-
Garnish with fresh cilantro if desired. Serve immediately with crackers or vegetables.
Nutrition Facts
Servings 10
- Amount Per Serving
- Calories 180kcal
- % Daily Value *
- Total Fat 16g25%
- Sodium 280mg12%
- Total Carbohydrate 3g1%
- Dietary Fiber 1g4%
- Sugars 1g
- Protein 7g15%
* Percent Daily Values are based on a 2,000 calorie diet. Your daily value may be higher or lower depending on your calorie needs.
Note
For an extra flavor boost, toast the pecans in a dry skillet for a few minutes before chopping them for the coating. Let them cool completely first.