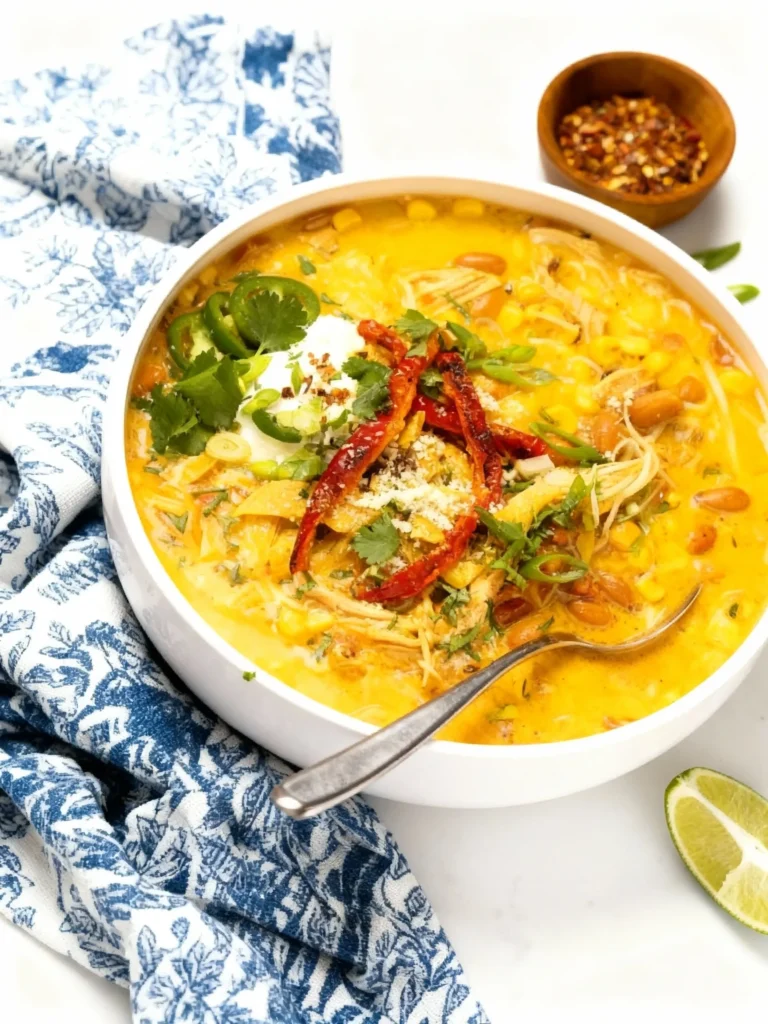
This easy Instant Pot chicken chili comes together in just 30 minutes, making it the ultimate weeknight comfort food dinner. It’s packed with tender shredded chicken, two kinds of hearty beans, sweet corn, and a flavorful tomato broth spiced just right. You only need about 5 minutes of prep, and then the pressure cooker does the rest of the work while you kick back (or more realistically, help the kids with homework!).
We’re talking minimal effort for a big payoff here. The best part? You can leave the chili on the Warm setting of your Instant Pot, and your family can serve themselves hot bowls whenever they’re ready. It’s a total lifesaver on those busy evenings filled with soccer practice, late meetings, and everything in between. And even though this chili cooks lightning-fast, it tastes like it simmered all day – cozy, nourishing, and absolutely delicious.
Why You’ll Love This Chicken Chili
- Fast and weeknight-friendly: This pressure cooker chicken chili is a true 30-minute meal from start to finish, yet it tastes like it’s been simmering for hours. It’s a quick chicken chili recipe you’ll rely on when time is tight but you want a hearty homemade dinner.
- Ridiculously easy to make: An easy Instant Pot chicken chili means the Instant Pot does almost all the work. You’ll sauté an onion and garlic for a few minutes, then dump in the rest of the ingredients. That’s it! The hands-on prep is minimal (literally around 5 minutes), so it’s perfect for busy or lazy nights. *(Yes, you will need to shred the chicken at the end, but it’s so tender it practically falls apart).*
- Healthy comfort food: This chili is loaded with lean protein and fiber, but it still delivers cozy comfort in every bite. With chicken breast, two types of beans, tomatoes, and corn, you’re feeding your family real, wholesome ingredients. It’s feel-good food that’s also belly-filling and satisfying.
- Family-friendly flavor: The chili comes out mildly spiced – warm and flavorful but not overly spicy. It’s kid-approved as-is, but you can always spice up individual bowls with hot sauce or jalapeños for those who like heat. Set out fun toppings like shredded cheese, sour cream, and avocado, and let everyone customize their bowl. (A toppings bar always makes dinner more fun!)
- One-pot convenience: Everything cooks in the Instant Pot, which means fewer dishes to wash. Hooray! You get that slow-cooked, developed chili flavor in a fraction of the time thanks to the pressure cooker. Plus, the leftovers are fantastic – the flavor only gets better the next day, and this chili freezes well for meal prep. In short, it’s a big win for both flavor and convenience.
Ingredients
Here’s what you’ll need to make this delicious, easy Instant Pot chicken chili. Most of these are simple pantry staples. Don’t you love when dinner comes together from things you already have?
- Olive oil: About 1 tablespoon, for sautéing. This helps soften the veggies and build flavor. (Feel free to use another neutral cooking oil like canola or vegetable oil if that’s what you have on hand.)
- Yellow onion: 1 medium, diced. The onion brings a subtle sweetness and savory base to the chili. Any onion (white or red) will work in a pinch, but yellow onions are perfect for that classic chili foundation.
- Garlic: 3 cloves, minced. Fresh garlic adds wonderful depth. If you don’t have fresh cloves, you can use about 1/2 teaspoon of jarred minced garlic per clove as a shortcut.
- Chicken breasts: 1 pound boneless, skinless chicken breasts (usually 2–3 pieces). These will cook whole and then be shredded for tender pieces throughout the chili. You can substitute boneless skinless chicken thighs for a richer flavor, or see the variations below for using pre-cooked rotisserie chicken.
- Black beans: 1 can (15 oz), drained and rinsed. Black beans add heartiness and fiber. Rinsing them helps remove excess salt and starch. If you prefer, you can swap in pinto beans or another favorite bean variety.
- Kidney beans: 1 can (15 oz), drained and rinsed. Using a second type of bean gives nice texture and color contrast. Red kidney beans are traditional in many chilis. You can use light or dark kidney beans. If you only have one type of bean on hand, that’s okay too – double up on it to replace the other.
- Corn: 1 can (15 oz) of corn, drained. Corn adds a pop of sweetness and a bit of texture to the chili. Canned corn is super convenient, but you could also use frozen corn (about 1 to 1½ cups; no need to thaw, the Instant Pot will cook it) or fresh corn cut off the cob in summer.
- Diced tomatoes: 1 can (15 oz), with juices. The tomatoes form the tomato-y broth base of our chili. We’re using plain diced tomatoes here. If you happen to have fire-roasted diced tomatoes, those would add a subtle smoky flavor (highly recommended if available!). But regular canned tomatoes work perfectly. No need to drain them; we want that juice in the pot.
- Chicken broth: 2 cups. The broth adds flavor and provides the liquid needed for the Instant Pot to come to pressure. Use low-sodium chicken broth if possible so you can control the salt. If you’re out of broth, you can substitute water mixed with a bouillon cube or just water (though you might want to bump up the spices in that case). Vegetable broth also works if that’s what you have.
- Chili powder: 2 tablespoons. Chili powder is a blend of spices (usually including ground chiles, cumin, garlic, etc.) that gives chili its signature flavor and red color. Don’t worry, 2 tablespoons sounds like a lot but chili powder is typically mild in heat. It adds a ton of flavor depth. Use your favorite chili powder brand – if you have a spicy variety, you can start with less and add more to taste.
- Cumin: 1 teaspoon. Cumin is warm, earthy, and essential for that classic chili taste. It pairs so well with chili powder. Even a small amount makes a big difference.
- Paprika: 1 teaspoon. Paprika adds a mild sweet pepper flavor and enhances the color of the chili. You can use regular paprika or swap in smoked paprika if you want a smoky undertone.
- Oregano: 1/2 teaspoon, dried. A touch of dried oregano gives a subtle herbal note that rounds out the spice profile. (If you have Mexican oregano, even better for a southwest vibe, but any oregano is great.) Crush it between your fingers as you add it to release more flavor.
- Salt and Pepper: To taste. You’ll season a bit at the start and adjust at the end. About 1 teaspoon of kosher salt and 1/4 teaspoon of black pepper is a good start for the whole pot, but always taste and tweak to your liking. Remember that canned beans and broth contain salt, so go easy initially – you can always add more later.
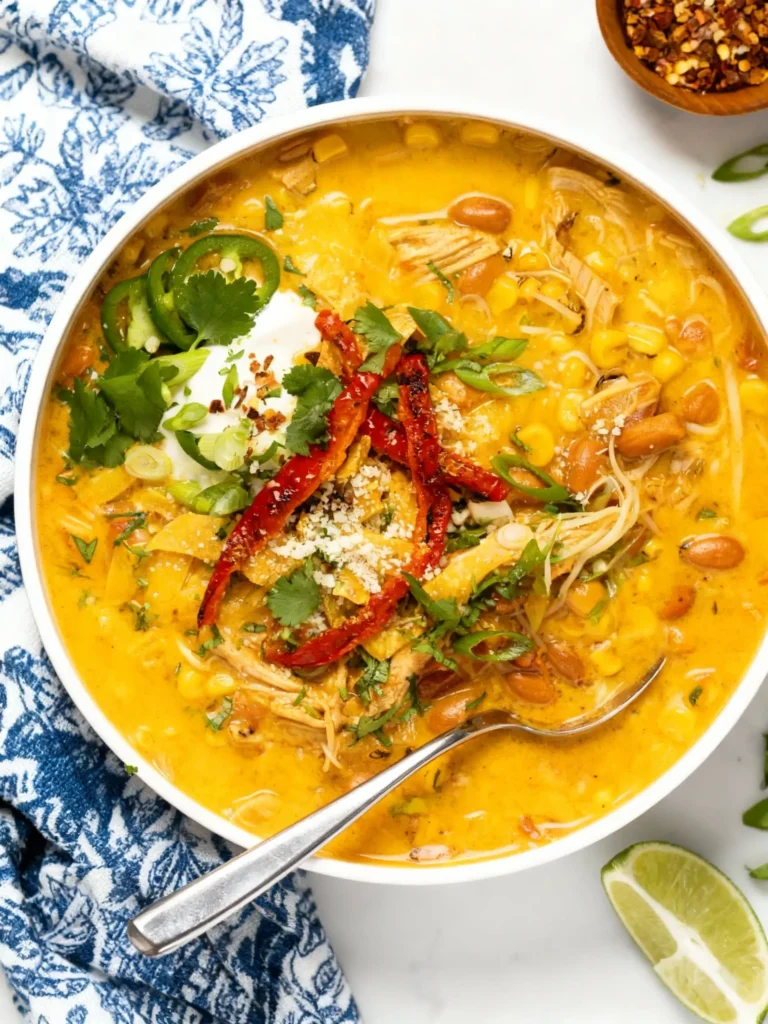
- Optional toppings: *The fun extras!* Set out your favorite chili toppings such as shredded cheddar or Monterey Jack cheese, a dollop of sour cream, fresh cilantro leaves, diced avocado, sliced green onions, or even some crunchy tortilla chips or strips. These add color, texture, and extra flavor to each bowl. Everyone can customize their chili and make it just how they like it.
Step-by-Step: How to Make It in the Instant Pot
- Sauté the aromatics: Set your Instant Pot to the “Sauté” function. Once it’s hot, add the olive oil. Sauté the diced onion for about 3-4 minutes, stirring occasionally, until it softens and turns translucent. Sprinkle a small pinch of salt and pepper on the onions as they cook. This layering of seasoning helps build flavor from the start. Next, add the minced garlic and let it cook for about 30 seconds, stirring constantly. You’ll smell that wonderful garlic aroma – be careful not to let it burn.
- Add spices and deglaze: Now add the chili powder, cumin, paprika, and oregano to the pot. Stir for about 30 seconds to toast the spices in the hot oil. This “blooms” their flavor, meaning you get a deeper, richer taste. (This short step makes a big difference in flavor, so try not to skip it!) Pour in a splash of the chicken broth (just a few tablespoons is fine) and stir, scraping up any browned bits from the bottom of the pot with your spoon. This deglazing step ensures all that flavor goes into the chili and helps prevent anything from scorching on the bottom.
- Add remaining ingredients: Hit “Cancel” to stop the sauté function (so the pot doesn’t get too hot). Add the drained black beans, drained kidney beans, drained corn, and the can of diced tomatoes (including all the juices) into the Instant Pot. Pour in the rest of the chicken broth. Give everything a good stir to combine. Tip: If your Instant Pot is sensitive to the “Burn” warning, you can hold off on stirring in the tomatoes until after pressure cooking (just let them sit on top) – but generally with enough broth, it’s fine to mix everything together.
- Add the chicken: Place the boneless chicken breasts into the pot, submerging them in the liquid and veggie mixture. If needed, move some beans and corn aside so the chicken sits mostly under the broth. It’s okay if a bit peeks out. Lock the Instant Pot lid in place and make sure the pressure release valve is set to Sealing.
- Pressure cook: Select the pressure cook setting (Manual/High Pressure). Set the cook time for 15 minutes. It will take a few minutes to build pressure before the timer starts counting down – in a 6-quart Instant Pot, expect 5-10 minutes of preheat time for this volume. While it’s cooking, you can tidy up or prepare your toppings.
- Natural release (important!): When the 15-minute cook time is up, let the Instant Pot do a Natural Pressure Release for about 10 minutes. This means don’t touch it – just let it sit and naturally release some pressure on its own. Natural release is gentler and helps the chicken stay super tender (and also prevents hot liquid from spluttering out). After 10 minutes, carefully turn the valve to Venting to quick release the remaining pressure. Once the float valve drops, it’s safe to open the lid.
- Shred the chicken: Open the lid and take out the cooked chicken breasts. They will be very tender. Use two forks to shred the chicken into bite-sized shreds. (You can also do this right in the pot if you prefer, but be careful not to scratch the pot’s bottom. Sometimes I’ll just hold a breast against the side of the pot and shred it there.) The chicken should fall apart easily – if by rare chance it’s not fully cooked (for example, extremely thick pieces), you can always lock the lid back on and pressure cook a few minutes more. But 15 minutes + natural release is typically perfect for 1 lb of chicken breasts.
- Stir and season: Return the shredded chicken to the pot and stir everything together. The chili will thicken up a bit with the shreds of chicken distributed throughout. Now is the time to taste and adjust the seasoning. Give it a sip (careful, it’s hot!) and add additional salt or pepper if needed. If you like more heat, you can stir in a pinch of cayenne or a dash of hot sauce. The consistency should be fairly thick and chunky – if it seems too thick for your liking, you can stir in a bit more broth to loosen it up.
- Serve: Ladle the steaming hot chicken chili into bowls. Set out the optional toppings and dress up your bowl however you like. We love ours with a sprinkle of cheddar cheese, a spoonful of sour cream, some fresh cilantro, and a few avocado chunks. A squeeze of lime juice over top can also really brighten the flavors. Now grab a spoon and dig in!
Substitutions and Variations
This Instant Pot chicken chili recipe is pretty flexible. Here are some easy substitution ideas and variations to suit your needs or use what you have:
- Different chicken cuts: Feel free to use boneless skinless chicken thighs instead of breasts. Thighs will turn out ultra tender and flavorful. The pressure cook time remains the same. If you have pre-cooked chicken (like a store-bought rotisserie chicken or leftover roast chicken), you can use that too – just shred or cube it. For pre-cooked chicken: reduce the pressure cook time to about 5 minutes (since we’re just infusing flavor and heating everything) and add the cooked chicken after pressure cooking (stir it in during the natural release period or just after, so it doesn’t overcook).
- Beans and legumes: You can mix and match the beans to your taste. Pinto beans, navy beans, or great Northern beans can replace the black or kidney beans. Want it extra hearty? Add a third can of beans. Prefer fewer beans? Use just one can total – it’s your chili, so customize the bean quantity. (If omitting one type of bean, you might slightly reduce the amount of broth so the chili isn’t too soupy.)
- Make it vegetarian or vegan: Yes, you can! Omit the chicken and use vegetable broth instead of chicken broth. Add an extra can of beans (or even some diced hearty vegetables like bell peppers, zucchini, or sweet potato) to bulk it up. Cook for just 8-10 minutes under pressure (since there’s no meat to cook through). You’ll have a lovely vegetarian Instant Pot chili that’s just as comforting. To make it vegan, also skip the dairy toppings or use plant-based substitutes.
- Spice it up (or down): As written, this chili is fairly mild, thanks to a standard chili powder which isn’t very hot. If you want to kick up the heat, try adding a diced jalapeño or serrano pepper when sautéing the onion and garlic. You could also add a pinch of cayenne pepper or a dash of hot sauce to the pot. For a smoky spice, chop up a chipotle pepper in adobo and add it in – that will give a delicious smoky heat. On the flip side, if you need it even milder (say, for kids), make sure to use mild chili powder and you can omit the paprika (or use sweet paprika instead of any spicy variety). You can also serve hot sauce at the table so spice lovers can customize their bowls.
- Creamy white chicken chili variation: If you’re craving a creamier, “white chili” style dish, you can adapt this recipe. After pressure cooking, stir in a splash of heavy cream (about 1/4 to 1/2 cup) or stir in 4 ounces of cream cheese until it melts into the broth. This will give the chili a richer, creamier texture. To go full “white chicken chili,” you could even substitute the diced tomatoes with a small can of mild green chilies (undrained) and add the cream. The result will be a cream-colored chili that’s luscious and slightly different in flavor – essentially a hybrid between this recipe and a classic white chicken chili. It’s a delicious change of pace!
- No Instant Pot? Other cooking methods: Don’t worry, you can still make a fantastic chicken chili without a pressure cooker. For a slow cooker: sauté the onion and garlic in a pan on the stove, then transfer to a crockpot. Add all other ingredients (beans, corn, tomatoes, spices, broth, chicken) to the slow cooker. Cook on Low for 6-8 hours or High for 3-4 hours, until the chicken shreds easily. Shred the chicken and stir it back in. (If using heavy cream or cream cheese for a creamy version, stir it in at the end in the slow cooker.) For a stovetop version: use a large pot or Dutch oven. Sauté onion and garlic in the oil, add spices as described, then add everything else. Bring to a gentle boil, then reduce heat and simmer covered for about 25-30 minutes, or until the chicken is cooked through and shreds. Shred the chicken and simmer a few more minutes to blend flavors. Both methods yield a wonderful chili – it will just take a bit longer than the Instant Pot, but your house will smell amazing!
Tips for the Best Flavor & Texture
- Don’t skip the sauté step: It might be tempting to throw all the ingredients in the Instant Pot and skip straight to pressure cooking (and full disclosure, I’ve tried the “dump it all in” method on an ultra-busy day – it works, but you lose some flavor). Taking those few minutes to sauté the onion and garlic, and to toast the spices, makes a noticeable difference in the depth of flavor. That little bit of caramelization from the onion and the fragrance of warmed spices really elevates this chili from good to great.
- Layer your seasoning: Season at multiple stages. Add a pinch of salt when sautéing the onions, and another pinch after adding the other ingredients, rather than all at the end. This ensures each component of the chili is well-seasoned and builds a more balanced flavor. You can always adjust with more salt at the end, but building it in layers creates a fuller taste. (Just go easy if your broth or canned beans are salted.)
- Prevent the burn warning: Instant Pot users know the dreaded “Burn” notice can be a mood-killer. To avoid it, make sure you deglaze the pot after sautéing. When you pour in that splash of broth to scrape up the browned bits, you’re doing two things: incorporating flavorful fond into your chili and preventing those bits from scorching. Also, ensure there’s enough liquid (this recipe has plenty with 2 cups broth plus juices from tomatoes). If your IP is very sensitive, you can add the tomatoes on top and not stir them in; tomato products are more prone to causing burn notices when in direct contact with the bottom.
- Use natural release for tenderness: Letting the pressure release naturally for about 10 minutes before quick-releasing the rest is key for ultra-tender chicken. Quick-releasing immediately can sometimes make meat seize up or become tough, and can also cause foamy liquid to shoot out of the valve. Patience pays off here – 10 minutes natural release is a sweet spot that allows the cooking to finish gently. If you forget and let it natural release longer (20 minutes or more), that’s totally fine too – it just means the chili might cool down a bit more and you may not even have to quick release at all if the pin drops on its own.
- Adjust consistency to your liking: After shredding the chicken and stirring, take a look at the chili. If you find it too thick, you can stir in a bit more hot broth or water to thin it out. If it’s too brothy for your taste, turn on the Sauté mode and let it simmer with the lid off for a few minutes to reduce and thicken. Another trick for a thicker chili is to mash a few of the beans against the side of the pot (or use a potato masher for a couple quick presses) – the starch from the beans will thicken the liquid naturally.
- Taste and tweak: Always taste your chili before serving and adjust the seasoning. Maybe you think it needs a touch more salt, another grind of black pepper, or a squeeze of lime to brighten it up. Every palate is different, and things like the brand of broth or tomatoes you used can affect the saltiness and flavor. Tasting is the only way to ensure the seasoning is spot on. Remember, you can also let each person adjust spice at the table with hot sauce or chili flakes if they want more heat.
- Have fun with the toppings: One of the joys of chili is loading it up with toppings! The contrast of cool, creamy sour cream or Greek yogurt with the warm, spicy chili is amazing. Crunchy elements like tortilla chips or crackers give a nice texture. Fresh herbs or a bit of green onion add a pop of freshness. So don’t hold back – a simple pot of chili can feel like a feast with a good selection of toppings. Plus, if you have kids, letting them “decorate” their own bowl might entice them to eat more.
Storage + Freezing Tips for Meal Prep
This chicken chili is even better the next day, which makes it ideal for meal prep. Here’s how to store and reheat leftovers:
- Refrigerator: Allow the chili to cool slightly, then transfer it to an airtight container. Store in the fridge for up to 4 days. (In my house, we rarely have it last that long – lunch the next day usually takes care of the leftovers!) The flavors will continue to develop as it sits, so don’t be surprised if it tastes even richer tomorrow.
- Freezer: This chili freezes beautifully. Let it cool completely, then ladle it into freezer-safe containers or heavy-duty zip-top freezer bags. If using bags, lay them flat in the freezer for efficient storage. You can freeze it for up to 3 months with great results. Label it with the date and name so you remember what it is. Chili is one of those dishes that’s awesome to find in your freezer on a cold night.
- Thawing: The best way to thaw frozen chili is to move it to the refrigerator and let it thaw overnight. If you’re in a hurry, you can reheat from frozen on the stove over low heat – just add a splash of water and cover the pot, stirring occasionally, until it loosens up and heats through.
- Reheating: Reheat refrigerated chili either in the microwave or on the stovetop. For the microwave, put a portion in a microwave-safe bowl, cover it (to avoid splatters), and heat in 1-2 minute bursts, stirring in between, until hot. On the stovetop, place the chili in a saucepan over medium heat, stirring occasionally, until it’s bubbling and warmed through. If the chili has become very thick after cooling (sometimes the beans absorb more liquid), stir in a little water or broth when reheating to get the consistency you want. And don’t forget to perk it up with a little fresh seasoning or a new batch of toppings when serving again.
Meal prep tip: You can make a full batch of this chili on Sunday and portion it out for grab-and-go lunches. It will keep well in the fridge for the work week, or freeze portions for longer. Having a hearty, protein-packed meal ready to reheat can be a real game-changer during a busy week.
FAQ
Can I use frozen chicken breasts in this Instant Pot chili? Yes, you can use frozen chicken breasts without thawing, which is one of the beauties of the Instant Pot! If using frozen chicken, make sure the pieces are separated (not one big block of chicken stuck together). You do not need to increase the pressure cook time (15 minutes still works), but note that it will take longer for the Instant Pot to reach pressure. Always check that the chicken is cooked through and shreds easily; if your chicken pieces were very large and you’re unsure, you can use a meat thermometer to ensure they reached 165°F internally. In our experience, 15 minutes under high pressure + natural release has cooked frozen breasts just fine. Once done, shred the chicken as usual. It might take a few extra minutes for the pot to depressurize, but it’s so convenient to go from freezer to table.
How do I thicken the chili if it’s too thin? The chili should be moderately thick thanks to the beans and shredded chicken, but if you find it a bit more liquidy than you like, you have options. The simplest way: use the back of a spoon or a fork to mash some of the beans in the chili; the natural starches will thicken the broth. Or, after pressure cooking, switch to sauté mode and let the chili simmer uncovered for a few minutes to evaporate excess liquid (stir frequently to prevent sticking). In a pinch, you can mix a teaspoon of cornstarch with a couple tablespoons of cold water to make a slurry and stir that in, then simmer for a minute – it will thicken almost instantly. Conversely, if your chili turns out too thick (perhaps the beans absorbed a lot of liquid), just stir in a bit more broth or water to loosen it. It’s an easy fix either way.
Is this Instant Pot chicken chili spicy? As written, this chili is on the mild-medium side. The primary spices (chili powder, cumin, paprika) are flavorful but not very hot. So it’s very family-friendly and a great kid-approved chili. If you use a chili powder brand that has some cayenne in it, there might be a gentle kick, but generally it’s not spicy-hot. If you or your diners are sensitive to spice, stick to mild chili powder and you’ll be all set – there’s no added fresh chili peppers in the base recipe. On the other hand, if you love spice, you absolutely can crank up the heat (see the variations section for ideas). Add hot sauce, crushed red chili flakes, fresh jalapeños, or a pinch of cayenne to give it more of a punch. The recipe is a great base that you can make as mild or as fiery as you want.
What’s the difference between this recipe and white chicken chili? The main difference is the broth base and the presence of tomatoes. Traditional white chicken chili typically has a broth made with chicken stock and often includes dairy (cream, half-and-half, or cream cheese) to give it a creamy, whitish color. It usually features Great Northern or cannellini beans, green chiles, and no tomatoes (hence “white”). This Instant Pot chicken chili recipe uses a tomato-based broth (giving it a red hue) and we did not include any dairy in the base recipe, so it’s more of a classic chicken red chili. Think of it like a traditional beef chili, but with chicken and a lighter, brighter feel. That said, you can certainly turn this into a creamy style chili by adding some cream or cream cheese as mentioned in the variations. Both versions are delicious – they’re just different flavor profiles. If you’re specifically craving white chicken chili, you might also check out a dedicated white chicken chili recipe, or try the creamy variation we suggested to get a similar effect.
Can I double this recipe? You can almost double it, with a few cautions. The limiting factor is the size of your Instant Pot. This recipe fits comfortably in a 6-quart Instant Pot as written. If you double all the ingredients, make sure it does not exceed the “Max Fill” line (remember that soups/chilis should not go above about 2/3 of the pot’s capacity). In a 6-quart, a full double might be very close to the limit. If you have an 8-quart Instant Pot, doubling is no problem at all – there will be plenty of space. The cook time would remain 15 minutes, but keep in mind it will take longer to come to pressure with the increased volume (and a bit longer to release pressure too). If you only have a 6-quart, you could do 1.5 times the recipe instead of a full double, or cook it as written and make a second batch if you need a larger quantity. Also, when doubling, taste and adjust seasoning – you might find you want a touch more salt or spices since it’s a bigger pot of chili.
Can I use pre-cooked or rotisserie chicken? Absolutely. Using rotisserie or leftover cooked chicken is a great shortcut. Since the chicken is already cooked, you don’t need to pressure cook it for the full time. The easiest method: follow the recipe to sauté the onion, garlic, and spices, and add everything else except the cooked chicken. Pressure cook the beans, corn, tomatoes, spices, and broth for maybe 5 minutes (that’s plenty to meld the flavors and heat everything). Then do a quick pressure release, open the lid, and add in your shredded or diced cooked chicken. The residual heat will warm the chicken, or you can use the sauté function for a couple minutes to simmer it. This way, the chicken won’t get overcooked or mushy. If you accidentally cooked it the full time, it wouldn’t ruin anything, but the chicken might be a bit softer and stringier. So, for best texture, shorten that cook time when using pre-cooked chicken.
I don’t have an Instant Pot – can I make this on the stove? Yes, we touched on this in the variations, but here’s a quick rundown: Use a large soup pot or Dutch oven on the stovetop. Follow the same basic steps – sauté onion and garlic in oil over medium-high heat, add spices and cook briefly. Add the broth to deglaze, then everything else (beans, tomatoes, corn, raw chicken, etc.). Bring it to a boil, then reduce heat and cover the pot. Let it simmer for about 20-30 minutes, stirring occasionally, until the chicken is cooked through (165°F internal or no pink in the middle) and the flavors have come together. You might need to add a bit more liquid on the stovetop if too much evaporates – just keep an eye on it so it doesn’t dry out or scorch. Once the chicken is done, shred it and return it to the pot, then serve. The stovetop method will take a little longer (and require you to stir now and then so it doesn’t stick), but it’s still a straightforward one-pot recipe. And if you have time to let it simmer gently for longer (say an hour), it’ll only get better.
What are the best toppings for chicken chili? Toppings really take this chili to the next level. Some popular options are: shredded cheese (cheddar, Colby Jack, pepper jack for a kick, etc.), a spoonful of sour cream or Greek yogurt (adds a cool, creamy element), diced or sliced avocado (for creamy texture and healthy fats), fresh cilantro or parsley on top (for color and freshness), sliced green onions or chives, pickled jalapeños for some tangy heat, and a squeeze of lime juice to brighten everything up. And don’t forget something crunchy – tortilla chips, corn chips (like Fritos), or even saltine crackers on the side. There’s no wrong answer here. Set out a little topping bar and let everyone personalize their chili bowl. It’s an easy way to make a simple meal feel special.
What to Serve It With
A hearty bowl of chicken chili can be a complete meal on its own, but it also pairs well with a variety of sides and dippers. Here are some ideas for what to serve with this Instant Pot chicken chili:
- Cornbread: Chili and cornbread are a match made in heaven. Serve warm, buttery cornbread on the side for dunking and soaking up that delicious chili. You can bake a quick skillet cornbread or even toast up some store-bought cornbread. The sweetness of cornbread complements the spicy, savory chili perfectly.
- Crusty bread or rolls: If cornbread isn’t your thing, any good crusty bread (like a baguette or sourdough) or soft dinner rolls will do the trick. It’s all about having something to mop up the last bits from the bowl.
- Tortilla chips: Set out a bowl of tortilla chips and treat the chili like a dip, or crumble a few chips on top of your bowl for crunch (kind of like chili nachos!). You can also serve the chili with corn tortilla strips or even over a bed of lightly crushed tortilla chips for a “Frito pie” style serving.
- Rice or quinoa: To stretch the meal or for an extra-filling option, serve the chili over rice. Spoon it on top of steamed white rice, brown rice, or quinoa in each bowl. The grains will soak up the flavorful sauce and make it a bit like a burrito bowl. This is a great option if you have very hungry eaters or want to change up leftovers for a second meal.
- Salad or veggie side: Since the chili is rich and hearty, sometimes it’s nice to pair it with a simple green salad. A crisp romaine salad with a tangy vinaigrette or a classic Caesar salad can lighten up the meal. Even just some carrot and celery sticks with ranch on the side (like you’d serve with wings) can be a refreshing crunchy accompaniment between bites of chili.
- Toppings bar: As mentioned, consider your toppings part of the “serving” fun. Lay out small bowls of those optional toppings – shredded cheese, sour cream, cilantro, avocado, etc. – and maybe some extras like diced red onion, lime wedges, or hot sauce. Letting each person dress up their bowl is interactive and ensures everyone gets their perfect bowl of chili. Plus, it looks inviting on the table!
No matter what you serve with it, this chicken chili is a satisfying main course. It’s casual enough for a game day gathering (hello, chili bar!) but comforting enough for a Sunday family dinner. You really can’t go wrong.
More Cozy Soups & Instant Pot Meals to Try
If you loved this easy Instant Pot chicken chili, you’ll also enjoy these related recipes:
- Short Rib Chili – A rich, slow-simmered beef chili made with tender braised short ribs. It’s the perfect alternative when you want to impress or have a lazy Sunday to cook. All the classic chili flavors you love, with an extra beefy twist.
- Slow Cooker Shredded Chicken Tacos – A family-favorite that’s just as easy and hands-off. Juicy shredded chicken with southwest spices, made in the slow cooker. It’s a great set-it-and-forget-it meal for taco night, and the leftovers (if any) are awesome for burrito bowls or nachos.
- 30-Minute Chicken Tortilla Soup – Another quick pressure cooker recipe! This soup has similar ingredients to chicken chili (beans, chicken, tomatoes) but with a lighter broth and Mexican-inspired toppings like crispy tortilla strips. It’s like chili’s brothy cousin – super flavorful and fast.
- Instant Pot Beef Chili – Prefer beef? This Instant Pot beef and bean chili is ready in a flash and delivers that cooked-all-day flavor. Ground beef, tomatoes, and kidney beans make a classic chili that’s perfect for potlucks or a cozy night in.
These recipes are perfect for when you need a comforting meal without spending hours in the kitchen. Enjoy!
Use Your Leftovers
Reduce food waste by making these recipes with your leftover ingredients:


Easy 30 Minutes Instant Pot Chicken Chili
Description
A quick, hearty chili with tender chicken, beans, and warm spices, all made effortlessly in your Instant Pot for a cozy meal any night.
Ingredients
Instructions
-
Set your Instant Pot to Sauté mode and heat the olive oil.
-
Add the diced onion and cook until softened, about 3 minutes.
-
Stir in the minced garlic and cook for another 30 seconds until fragrant.
-
Place the whole chicken breasts on top of the onion mixture.
-
Add the black beans, kidney beans, corn, diced tomatoes, and chicken broth.
-
Sprinkle in the chili powder, cumin, paprika, oregano, salt, and pepper.
-
Secure the lid, set to High Pressure for 10 minutes, then allow natural release for 5 minutes.
-
Carefully quick release any remaining pressure and open the lid.
-
Remove the chicken breasts and shred them with two forks.
-
Return the shredded chicken to the pot and stir to combine.
-
Let the chili sit for a couple of minutes to thicken slightly.
-
Taste and adjust seasoning if needed.
-
Ladle into bowls and top with your favorite garnishes.
-
Serve hot and enjoy!
Nutrition Facts
Servings 6
- Amount Per Serving
- Calories 320kcal
- % Daily Value *
- Total Fat 6g10%
- Sodium 680mg29%
- Total Carbohydrate 35g12%
- Dietary Fiber 10g40%
- Sugars 6g
- Protein 28g57%
* Percent Daily Values are based on a 2,000 calorie diet. Your daily value may be higher or lower depending on your calorie needs.
Note
You can use frozen chicken breasts in this recipe – keep the cook time the same (15 minutes at high pressure). The Instant Pot will just take longer to reach pressure, and the chicken will cook through during the 10-minute natural release. Be sure the internal temperature of the chicken reaches 165°F. For an extra-thick chili, mash some of the beans or add a tablespoon of tomato paste before pressure cooking. For a creamier chili, stir in a 1/4 cup of heavy cream or a few ounces of cream cheese after cooking. This recipe was tested in a 6-quart Instant Pot.