There’s something unbelievably satisfying about biting into a warm, gooey cheeseburger bomb. The idea sparked during a casual get-together with friends—I wanted to create a dish that’s packed with flavor yet simple enough to prepare in large batches. These Garlic Parmesan Cheeseburger Bombs have since become a staple in my kitchen, turning a standard weeknight dinner into a flavorful feast.
Why you’ll love this recipe
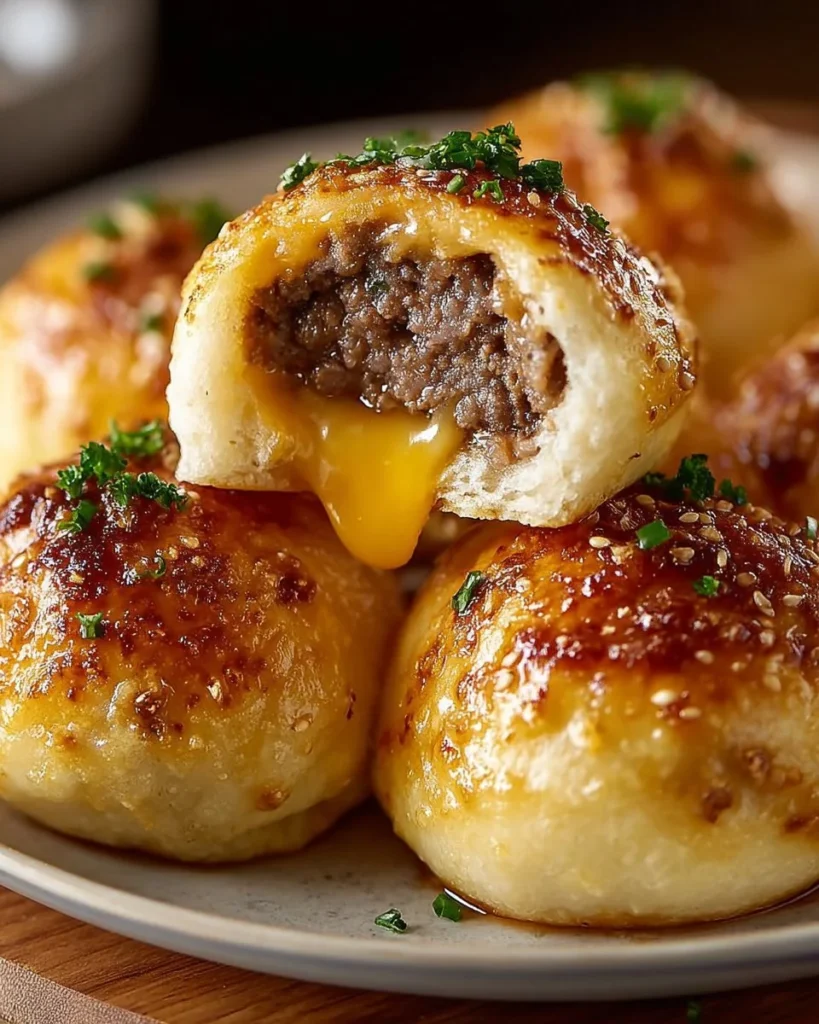
Imagine this: decadent ground beef, melty cheddar, and aromatic garlic wrapped snugly in warm, pillowy biscuit dough, then topped with a crisp, cheesy Parmesan finish. Are you already drooling? The beauty of these bombshells is their versatility—you can whip them up as an appetizer for game day, a fun dinner for the family, or even a light snack while binge-watching your favorite series. The balance of rich flavors and delightful textures has officially garnered my heart (and my friends’!), making them an irresistible choice for any occasion.
Not to mention, they’re a breeze to make! If you’ve been hesitant about diving into the world of comfort food, this is your perfect gateway. Seriously, if you’re looking for a dish that’s sure to impress without overwhelming you in the kitchen, you’ve just struck culinary gold.
Gather these ingredients
Let’s dive into what you’ll need to bring these cheeseburger delights to life:
-
Ground Beef: 1 lb (80/20 fat content recommended) – The fat content is where the magic lies! It keeps the beef juicy and flavorful, ensuring every bite bursts with savory goodness. If you’re looking for a leaner option, turkey or chicken can work wonders, too.
-
Cheddar Cheese: 1 cup, shredded – You can’t go wrong with classic sharp cheddar for that melty, gooey goodness. Feel adventurous? Mix in some Monterey Jack or a bit of pepper jack for a kick.
-
Garlic Powder: 2 tsp – A staple that enhances that well-loved garlic flavor. Fresh minced garlic is also a delightful swap that’ll give your bombs a rich aroma.
-
Salt: 1 tsp – Essential for bringing out all the flavors. There’s never too much seasoning in this scenario!
-
Black Pepper: 1 tsp – Just a pinch of this adds a bit more depth. Freshly cracked is the way to go if you want that extra oomph!
-
Refrigerated Biscuit Dough: 2 cans (8 biscuits each) – The dough does all the hard work! It’s the perfect flaky exterior that holds everything together. If you’re feeling ambitious, homemade biscuit dough can elevate this dish to gourmet.
-
Butter: 2 tbsp, melted – Butter adds richness and glossiness to the tops of the bombs before baking, ensuring they emerge golden and beautiful.
-
Parmesan Cheese: ½ cup, grated – A sprinkle of this cheesy goodness right before serving creates the ultimate flavor explosion!
-
Garlic Powder: 1 tsp – We’ll use a bit more to highlight the finished dish and amplify that delicious garlic flavor, making everyone at your table swoon.
Preparing Garlic Parmesan Cheeseburger Bombs Recipe
Ready to get cooking? Let’s break this down step-by-step—no worries, this isn’t a marathon but a delightful sprint!
-
Prepare Your Ingredients: Gather your ingredients, ensuring everything is within arm’s reach. Chop, grate, and measure so you can seamlessly transition from one step to the next without scrambling like a mad chef.
-
Cook the Ground Beef: Grab a skillet and over medium-high heat, cook your ground beef until it’s browned through. Toss in 2 tsp of garlic powder, salt, and black pepper. This is where the savory magic happens! Once cooked, drain any excess fat and let it cool for a moment.
-
Assemble Your Cheeseburger Bombs: Preheat your oven to 375°F (190°C). Open the biscuit dough and carefully flatten each biscuit. Spoon a bit of the beef mixture and a sprinkle of shredded cheddar onto each biscuit circle, then fold it up and pinch the seams to seal in all that deliciousness.
-
Bake the Cheeseburger Bombs: Arrange them on a greased baking sheet, leaving a little space for expansion. Brush the tops with melted butter, and then bake for about 12-15 minutes or until golden and flaky.
-
Add the Parmesan Garlic Topping: Finally, while they’re still warm, sprinkle that glorious grated Parmesan cheese and an extra pinch of garlic powder over the hot bombs. They’ll melt ever so slightly, and you’ll be left with crispy, cheesy perfection!
Best way to enjoy it
When it comes to serving these scrumptious cheeseburger bombs, I often think less is more. They shine as is, but why not elevate this experience? A simple side of homemade potato wedges, fresh coleslaw, or a vibrant green salad can balance the richness of the bombs beautifully. And don’t forget about dipping sauces! A zesty ketchup or tangy ranch dressing can take things to an exhilarating new level.
Storage and reheating tips
Should you have any leftovers (which is rare!), here’s how to keep those golden goodies fresh. Store them in an airtight container in the fridge for up to 3 days. For freezing, wrap individual bombs in plastic wrap and then place them in a freezer bag for up to a month. To reheat, just pop them in the oven at 350°F (175°C) for about 10-12 minutes. You’ll want to keep that crispy outer layer intact, and the oven does just the trick.
Helpful cooking tips
Let’s make sure you nail this! First, don’t skimp on the seasoning. A well-seasoned filling is the heartbeat of every dish. And please—make sure to seal those biscuits well; nobody likes a beefy explosion! If you want a vegetarian twist, swap the beef for a mixture of sautéed mushrooms and bell peppers, seasoned just right. You’ll thank me later!
Creative Twists
Feel like switching it up? Consider stuffing the bombs with different cheeses—think gooey mozzarella or spicy pepper jack. You could even incorporate sautéed onions or pickles for that true cheeseburger experience. Feel free to sprinkle some fresh herbs like parsley or chives over the top before serving to give it an extra pop!
Common questions
What’s the prep time for these bombs?
Preparation should take about 20 minutes, with another 15 for baking. A cinch, right?
Can I use ground turkey instead of beef?
Absolutely! Ground turkey or chicken is a lighter alternative that works beautifully.
What’s the best way to serve leftovers?
Reheat in the oven for the best texture, but if pressed for time, a quick zap in the microwave works too.
Can I freeze these before baking?
Yes! Assemble the bombs, freeze them on a baking sheet, and then transfer to a freezer bag for future munching.
How can I customize the fillings?
Your imagination is the limit! Veggies, different proteins, or even spices can give these bombs a unique twist.
After whipping up a batch of these Garlic Parmesan Cheeseburger Bombs, you might just find them becoming a crowd favorite, bringing smiles to your dining table. They’ll make your home feel like a cozy diner filled with laughter and warmth. So, gather your ingredients, roll up your sleeves, and let the deliciousness unfold! Don’t forget to share your masterpiece or any variations you try—I can’t wait to hear about your culinary adventures!
Use Your Leftovers
Reduce food waste by making these recipes with your leftover ingredients:


Garlic Parmesan Cheeseburger Bombs Recipe
Description
Decadent ground beef, melty cheddar, and aromatic garlic wrapped in warm, pillowy biscuit dough, topped with a cheesy Parmesan finish.Ingredients
Main Ingredients
Instructions
Prepare Your Ingredients
-
Get Ready
Gather your ingredients, chopping, grating, and measuring as needed.
Cook the Ground Beef
-
Brown the Beef
In a skillet over medium-high heat, cook ground beef until browned. Add garlic powder, salt, and black pepper. Drain excess fat and let cool.
Assemble Your Cheeseburger Bombs
-
Preheat the Oven
Set your oven to 375°F. Flatten each biscuit, spoon in beef mixture and cheddar, fold and seal.
Bake the Bombs
-
Bake
Place on a greased baking sheet, brush with melted butter and bake for 12-15 minutes until golden.
Add the Topping
-
Finish with Parmesan
Sprinkle grated Parmesan and garlic powder over warm bombs before serving.
Nutrition Facts
Servings 16
- Amount Per Serving
- Calories 250kcal
- % Daily Value *
- Total Fat 17g27%
- Saturated Fat 7g35%
- Trans Fat 0.5g
- Cholesterol 40mg14%
- Sodium 300mg13%
- Potassium 150mg5%
- Total Carbohydrate 18g6%
- Dietary Fiber 1g4%
- Sugars 1g
- Protein 10g20%
- Vitamin A 8 IU
- Vitamin C 0 mg
- Calcium 100 mg
- Iron 2 mg
- Vitamin B12 1.5 mcg
- Phosphorus 150 mg
- Zinc 2 mg
* Percent Daily Values are based on a 2,000 calorie diet. Your daily value may be higher or lower depending on your calorie needs.