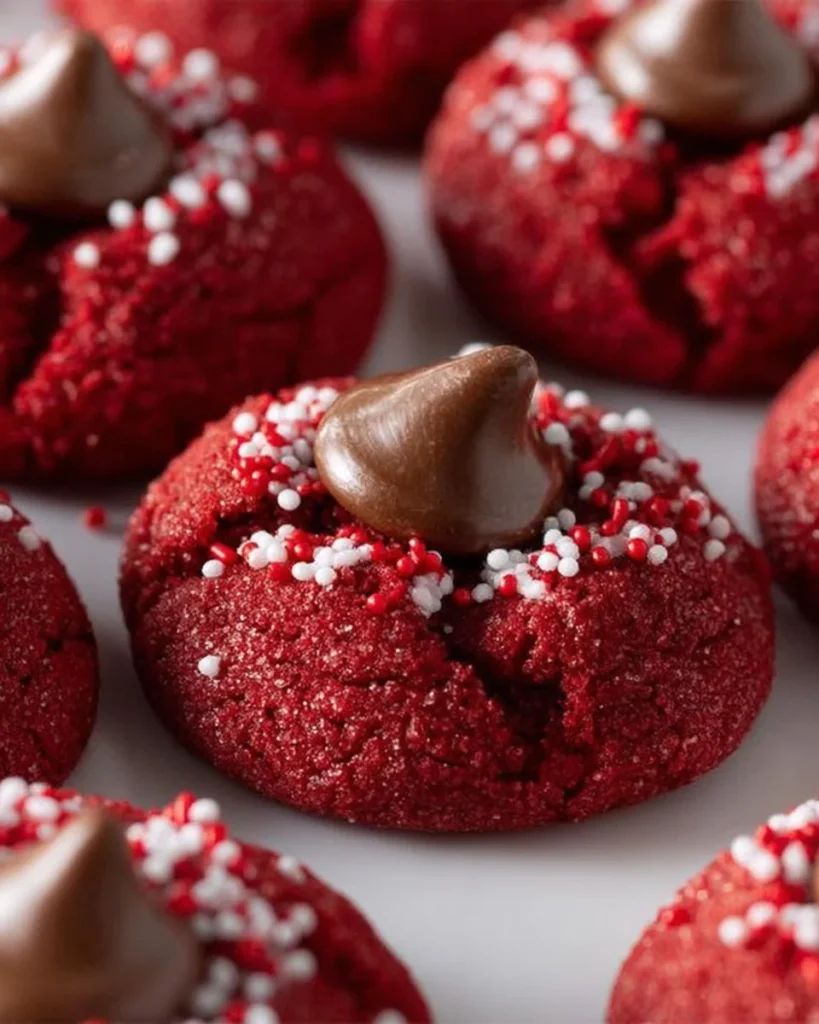
Oh, my friend, if there’s ever been a cookie that embodies all things love and celebration, it’s got to be these Hershey’s Red Velvet Blossoms. Just picture it: a tender, red velvet cookie emerging from the oven, topped with a melting Hershey’s chocolate kiss, a true visual and flavor feast! Every time I whip these up, I can’t help but reminisce about my childhood, curling up with my grandmother as she introduced me to the culinary magic of red velvet. These cookies aren’t just treats; they’re a slice of nostalgia and pure joy. Now, let me share my secrets to making them perfectly every time.
Why You’ll Love This Recipe
These Red Velvet Blossoms aren’t just a feast for the eyes—they’re also a delightful explosion of flavors and textures. The combination of brown sugar and a hint of cocoa powder creates a warm, cozy background, while the red food coloring offers a fun pop of color that immediately brightens up your day. What’s more, the addition of that luscious Hershey’s kiss on top? Absolute heaven.
But here’s where it gets even better: these cookies are so versatile. Whether you’re planning a festive gathering or just a quiet night in, they fit perfectly with any occasion. Plus, the simplicity of the recipe means you don’t have to be a baking pro to impress your family and friends. Trust me, they’ll be raving about these cookies—and you’ll feel like a rock star in the kitchen!
Gather These Ingredients
Now, let’s talk about the star players that make this cookie magic happen:
- 7 tbsp butter (salted or unsalted, softened): The butter is our base; it brings that rich decadence we all crave. If you’re feeling adventurous, try browning the butter first for a nutty depth.
- 1/2 cup brown sugar: This adds not just sweetness but also a hint of moisture and that wonderful caramel undertone. Light or dark, your choice!
- 2 tbsp granulated sugar: Just a little granulated sugar boosts sweetness and helps achieve a light, tender texture.
- 1 tsp vanilla extract: Never underestimate the power of good vanilla! It adds a lovely warmth that complements the cocoa.
- 1 large egg yolk: Just the yolk, please! It enriches the dough and gives our cookies that luscious richness.
- 1/4 tsp red food coloring gel: This is the pièce de résistance, giving our cookies that signature red hue. Gel works best as it doesn’t change the consistency of the dough.
- 1 cup all-purpose flour: The backbone of our dough, providing structure without being too heavy.
- 1 tbsp cocoa powder: We’re not making brownies, but a touch of cocoa enhances that chocolatey essence.
- 1/2 tsp baking powder: Helps our cookies rise perfectly, so we don’t end up with flat pancakes!
- 1/4 tsp salt: Just a pinch brings out all those sweet flavors beautifully.
- 1/4 cup red sanding sugar: This adds an extra crunch and a sparkly finish—party in your mouth!
- 18 Hershey chocolate kisses: The cherry on top! These hugs of chocolate melt beautifully and create the perfect contrast to the soft cookie.
Preparing Hershey’s Red Velvet Blossoms
Alright, ready to dive in? Here’s how it all comes together:
-
Preheat your oven to 350°F (175°C) and line a large baking sheet with parchment paper. Set it aside for now; we’ll come back to it.
-
In your stand mixer, cream the softened butter, brown sugar, and granulated sugar together until the mixture is smooth and airy. This step is crucial, so don’t rush it! It gives our cookies that tender texture.
-
Next, add the egg yolk, vanilla extract, and red food coloring gel. Mix until everything is well combined—you want that stunning red color to spread evenly!
-
Now, sift in the flour, cocoa powder, baking powder, and salt. Mix just until the flour disappears; over-mixing can make the cookies tough, and no one wants that!
-
Grab a tablespoon, and scoop out 18 equal-sized dough balls. Roll them gently between your hands—this is your moment! Then roll those delightful balls in the red sanding sugar, ensuring they’re fully coated.
-
Place the sugar-coated dough balls on your prepared baking sheet, spacing them apart. Bake them in the oven for about 10 minutes. Keep an eye on them; you want them just set, not overdone!
-
As soon as they come out, gently press a chocolate kiss into the center of each cookie. You’ll feel a little rush of joy as the chocolate starts to melt—such a beautiful sight!
-
Let them cool on the baking sheet for about 10 minutes before transferring to a cooling rack. It’ll be hard not to sneak a bite—but believe me, the wait is worth it!
Best Way to Enjoy It
These cookies are truly delightful fresh out of the oven, with that warm, gooey chocolate kiss just waiting for you to take a bite. Serve them as a sweet treat at a party, or package them up as gifts for friends—they’re always a hit! You can also enjoy these lovelies with a tall glass of cold milk or a warm cup of coffee. Trust me, it’s nirvana.
Keeping Leftovers Fresh
Now, let’s talk storage. If you happen to have leftovers (which I doubt, but just in case), you can keep these beauties in an airtight container at room temperature for up to a week. If you want to keep them longer, stack them in a freezer-safe container, separated by parchment paper, and freeze for up to three months. Just pop them in the microwave for a few seconds once you’re ready for another bite of that divine goodness!
Extra Tips for a Successful Recipe
Here are a few chef secrets and tips that will take your baking to the next level:
- Room temperature ingredients: Make sure your butter and egg yolk are at room temperature. This helps them incorporate more easily and contributes to that dreamy texture.
- Don’t forget the cooling time: Letting the cookies cool on the baking sheet is vital. It allows them to firm up a bit and enhances their flavor.
- Swap it up: If you want to try something different, combine white chocolate chips with the kisses or sprinkle in some crushed pecans for a crunchy twist.
Creative Twists
Feeling adventurous? Here are some variations you can consider:
- Different Colors: Instead of red, use another color of food coloring for a themed party or holiday!
- Nutty Surprise: Add chopped nuts or a sprinkle of espresso powder for an added flavor depth.
- Gluten-Free Option: Substituting the all-purpose flour with a 1:1 gluten-free mix can work wonders!
Ingredients List
- 7 tbsp butter (salted or unsalted, softened)
- 1/2 cup brown sugar
- 2 tbsp granulated sugar
- 1 tsp vanilla extract
- 1 large egg yolk
- 1/4 tsp red food coloring gel
- 1 cup all-purpose flour
- 1 tbsp cocoa powder
- 1/2 tsp baking powder
- 1/4 tsp salt
- 1/4 cup red sanding sugar
- 18 Hershey chocolate kisses
Directions to Follow
- Preheat oven to 350°F and line baking sheet with parchment paper.
- Cream butter, brown sugar, and granulated sugar in a stand mixer.
- Add egg yolk, vanilla, and red food coloring; mix until combined.
- Sift in flour, cocoa powder, baking powder, and salt; mix until combined.
- Scoop dough into 18 balls and roll in red sanding sugar.
- Place on baking sheet, bake for 10 minutes.
- Press a chocolate kiss into each cookie immediately after baking.
- Cool on the baking sheet for 10 minutes, then transfer to a cooling rack.
Your Questions Answered
- Can I use whole eggs?: For this recipe, just the yolk is perfect, providing richness. If you use the whole egg, it will alter the dough’s consistency.
- How can I make them chocolaty?: Feel free to double the cocoa powder for a deeper chocolate flavor!
- What’s the prep time?: It typically takes about 15 minutes to prepare the dough, plus 10 minutes for baking.
- Can I make these ahead of time?: Absolutely! You can prepare the dough and refrigerate it for up to 24 hours before baking.
- What other toppings can I use?: Try mini marshmallows, caramel kisses, or even a drizzle of white chocolate for a decadent twist.
These Hershey’s Red Velvet Blossoms are more than just a cookie; they embody love, warmth, and the magic of homemade treats. The soft, chewy cookie with a sweet, chocolatey center is bound to bring smiles to your loved ones’ faces. I wholeheartedly invite you to whip up a batch, get messy, and don’t shy away from adding your own creative flair. And, hey, don’t forget to share your twists and experiences—let’s keep spreading that culinary joy! Happy baking!

Hershey’s Red Velvet Blossoms
Description
These Hershey's Red Velvet Blossoms are not just cookies; they capture love and celebration in every bite, featuring tender red velvet cookies topped with melting chocolate kisses.Ingredients for Hershey's Red Velvet Blossoms
Directions to Prepare
-
Preheat Oven
Preheat your oven to 350°F (175°C) and line a baking sheet with parchment paper. -
Cream Butter and Sugars
In a stand mixer, cream together softened butter, brown sugar, and granulated sugar until smooth and airy.This step is crucial for texture. -
Add Wet Ingredients
Add the egg yolk, vanilla extract, and red food coloring gel; mix until well combined. -
Incorporate Dry Ingredients
Sift in the flour, cocoa powder, baking powder, and salt; mix just until combined.Avoid over-mixing to keep cookies tender. -
Form Dough Balls
Scoop out equal-sized dough balls (about 18) and roll them in red sanding sugar.Coat fully for a nice crunch. -
Bake Cookies
Place on baking sheet and bake for about 10 minutes.They should be just set. -
Add Chocolate Kisses
Immediately press a chocolate kiss into the center of each cookie after removing from oven. -
Cool Cookies
Let cookies cool on the baking sheet for 10 minutes before transferring to a cooling rack.This helps them firm up.
Nutrition Facts
Servings 18
- Amount Per Serving
- Calories 120kcal
- % Daily Value *
- Total Fat 5g8%
- Saturated Fat 3g15%
- Trans Fat 0g
- Cholesterol 20mg7%
- Sodium 70mg3%
- Potassium 30mg1%
- Total Carbohydrate 18g6%
- Dietary Fiber 0g
- Sugars 10g
- Protein 1g2%
- Vitamin A 4 IU
- Vitamin C 0 mg
- Calcium 2 mg
- Iron 1 mg
- Vitamin D 0 IU
- Vitamin E 0 IU
- Vitamin K 0 mcg
- Thiamin 0 mg
- Riboflavin 0 mg
- Niacin 0 mg
- Vitamin B6 0 mg
- Folate 0 mcg
- Vitamin B12 0 mcg
- Biotin 0 mcg
- Pantothenic Acid 0 mg
- Phosphorus 0 mg
- Iodine 0 mcg
- Magnesium 0 mg
- Zinc 0 mg
- Selenium 0 mcg
- Copper 0 mg
- Manganese 0 mg
- Chromium 0 mcg
- Molybdenum 0 mcg
- Chloride 0 mg
* Percent Daily Values are based on a 2,000 calorie diet. Your daily value may be higher or lower depending on your calorie needs.