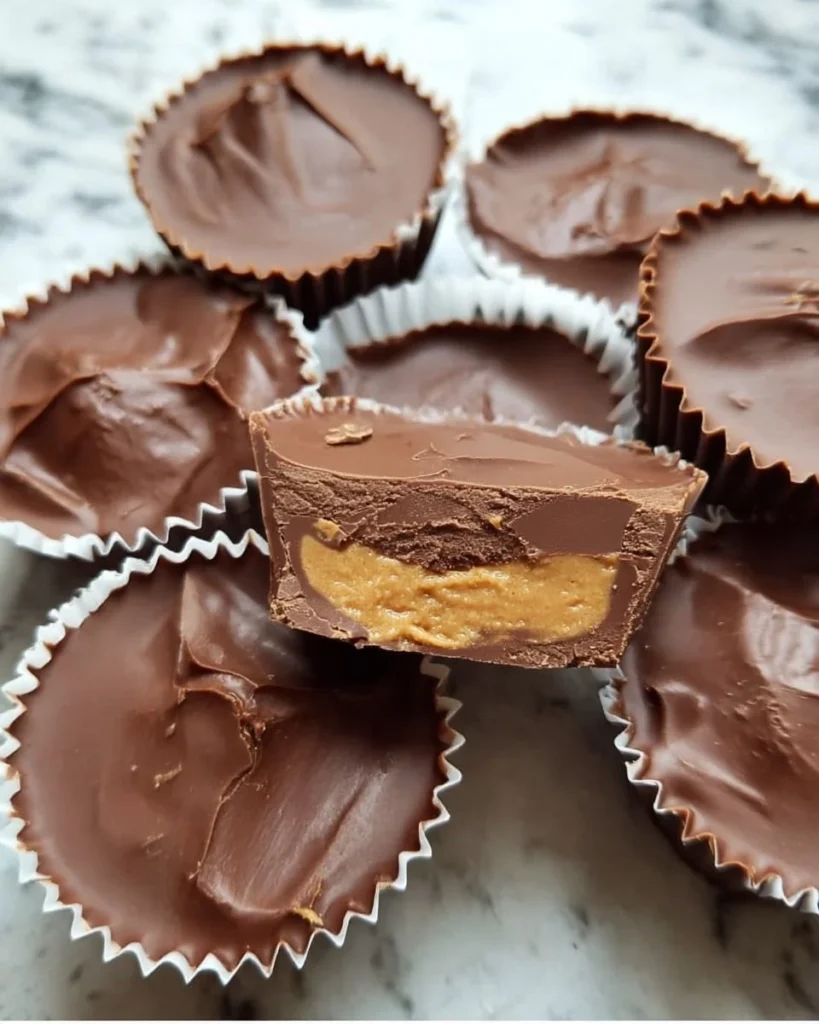
There’s something magical about biting into a creamy, rich peanut butter cup, isn’t there? The moment that sweet chocolate encases a velvety peanut butter center, it feels like you’ve found a tiny treasure. It takes me back to childhood—sneaking a treat after school, savoring the blissful combination that made everything seem right in the world. Today, I’m going to show you how to whip up your own Homemade Peanut Butter Cups. Trust me, once you master this simple recipe, you’ll never want to go back to store-bought versions!
Why you’ll love this recipe
Let’s dive into the goodness, shall we? First off, these peanut butter cups capture that perfect balance of sweet and salty that keeps you coming back for just one more (okay, maybe two). They’re indulgent yet surprisingly easy to make. There’s a delightful satisfaction that comes from creating your own treats from scratch, and this recipe is straightforward enough that you can step into the kitchen and feel like a confectionery wizard without breaking a sweat!
Even better, the flavor can be tailored to suit your mood—add a sprinkle of sea salt, or maybe some crushed nuts for a delightful crunch. Plus, they make for fantastic gifts. Picture your friends’ faces when they unwrap a little box of homemade love. Seriously, what’s not to love?
Gather these ingredients
To get started, let’s talk about what you’ll need. This recipe is an embodiment of simplicity and flavor.
-
Peanut Butter (1 cup): Ah, the star of our show! Smooth or crunchy, the choice is yours. Just be sure to use a high-quality peanut butter. It’s rich, creamy, and nutty—the soul of our cups! If you’re feeling adventurous, try almond or cashew butter for a twist!
-
Chocolate Chips (2 cups): We’re going for a luscious layer of chocolate here. Dark, semi-sweet, or even milk chocolate can all work their magic. Each variety brings its own personality, so choose what tickles your taste buds!
-
Powdered Sugar (1/4 cup): This sweet sprinkle adds a touch of bliss to the peanut butter, giving it that candy-like smoothness. You can adjust this based on how sweet you like your filling. Low-sugar? No problem! Use a sugar substitute that works best for you.
Preparing Homemade Peanut Butter Cups
Ready to get your hands sticky? Here’s a step-by-step guide to making your own peanut butter cups. Don’t worry if it feels like a lot—just take it one step at a time!
-
Melt the chocolate chips: Grab a microwave-safe bowl and pop in your chocolate chips. Heat them in the microwave in 30-second intervals, stirring vigorously until it’s gloriously smooth. (Don’t rush this! The smoothness here is pure magic!)
-
Line the muffin tin: Take out a muffin tin and line it with paper liners. This makes for easy removal later, and who doesn’t love easy cleanup?
-
Chocolate layer bottom: Pour the melted chocolate into each liner—just enough to create a small base. Use the back of a spoon to spread it evenly across the bottom.
-
Mix the peanut butter filling: In another bowl, stir together the peanut butter and powdered sugar until it’s all beautifully integrated. You want this mixture to be silky and smooth.
-
Spoon the peanut butter mixture: Now it’s time to spoon that luscious peanut butter mix onto the chocolate bases. Fill each liner until it’s about 2/3 full.
-
Top with more chocolate: Cover each peanut butter mound with another layer of melted chocolate. This will seal in all that goodness!
-
Chill out: Pop the tray into the refrigerator for about 30 minutes, or until they’re set. The waiting will be worth it!
-
Enjoy your masterpiece: Once chilled, peel them from the liners and savor every bite. Go on, I won’t judge if you have a second one!
Best way to enjoy it
Now you’ve got your creamy, dreamy peanut butter cups ready to devour! They’re perfect on their own, but you can spruce things up a bit. Why not serve them with a glass of cold milk or a scoop of vanilla ice cream for an indulgent dessert that pairs perfectly?
If you’re feeling festive, consider drizzling some melted chocolate or even caramel on top for that extra wow factor. Need a crunchy element? Crush some nuts to sprinkle on top, or even use a mix of white chocolate and dark chocolate for a stunning visual (and taste) contrast.
Keeping leftovers fresh
While these delightful treats are pretty hard to resist, you might find yourself with some extras. To keep them fresh, store your peanut butter cups in an airtight container in the fridge. They’ll last about a week—though I’d suggest devouring them within a few days to fully enjoy the deliciousness! If you’re feeling particularly generous, they also freeze beautifully, making them a luxurious treat anytime you need a chocolate fix.
Pro chef tips
-
Use quality chocolate: It makes a world of difference! Don’t shy away from premium chocolate; it adds depth and richness.
-
Peanut butter options: If you like a bit of spice, try adding a dash of cinnamon or vanilla extract to the peanut butter mix for an extra layer of flavor!
-
Chilling is crucial: Make sure they’re fully set in the fridge before enjoying. This prevents them from falling apart, giving you that perfect bite!
Recipe variations
Feeling like mixing it up? You can easily play around with flavors! Swap the regular peanut butter for any nut butter of your choice—or even sunflower seed butter for a nut-free option. Feeling adventurous? Add a pinch of spice like cayenne to the chocolate for a surprising kick!
Want a peanut butter cup with a twist? Consider adding crispy rice cereal to the chocolate layer for a delightful crunch or infuse a little coconut for a tropical vibe.
Ingredients
- 1 cup peanut butter
- 2 cups chocolate chips
- 1/4 cup powdered sugar
Directions to follow
- Melt the chocolate chips in a microwave-safe bowl, stirring every 30 seconds until smooth.
- Line a muffin tin with paper liners.
- Pour a small layer of melted chocolate into each liner and spread it over the bottom.
- In another bowl, mix peanut butter with powdered sugar until smooth.
- Spoon the peanut butter mixture on top of the chocolate in each liner.
- Cover with another layer of melted chocolate.
- Chill in the refrigerator until set, about 30 minutes.
- Enjoy your homemade peanut butter cups!
Common questions
-
Can I use natural peanut butter? Yes, just note that it may be a bit runnier than the regular stuff, so adjust accordingly.
-
How long will they keep? In the fridge, about a week; in the freezer, they can last for a couple of months!
-
What if I want to replace the sugar? You can use something like agave or maple syrup, but it may alter the texture, so make adjustments as needed.
-
Can I make them vegan? Absolutely! Just opt for dairy-free chocolate chips and ensure your peanut butter is vegan-friendly.
-
What’s the prep time? With a little practice, the entire process can take about an hour, including chilling.
Creating your own homemade peanut butter cups is not just straightforward—it’s a whole-hearted endeavor that brings joy and satisfaction. It’s an invitation to indulge in a classic treat made your way! I can’t wait to hear how yours turn out, so don’t forget to pour your creativity into this recipe! Happy cooking!

Homemade Peanut Butter Cups
Description
Indulge in these easy-to-make, creamy, and rich peanut butter cups that capture the perfect balance of sweet and salty. Perfect for gifts or a personal treat!Ingredients
Base Ingredients
Directions
Making the Peanut Butter Cups
-
Melt the chocolate chips
In a microwave-safe bowl, melt the chocolate chips in 30-second intervals, stirring until smooth. -
Line the muffin tin
Line a muffin tin with paper liners for easy removal. -
Create the chocolate layer
Pour a small layer of melted chocolate into each liner and spread it over the bottom. -
Prepare the peanut butter filling
In another bowl, mix peanut butter and powdered sugar until smooth. -
Add peanut butter mixture
Spoon the peanut butter mixture onto the chocolate bases, filling each liner 2/3 full. -
Seal with chocolate
Cover each peanut butter mound with another layer of melted chocolate. -
Chill to set
Refrigerate for about 30 minutes until set. -
Enjoy your creation
Once set, peel from the liners and enjoy your homemade peanut butter cups!
Nutrition Facts
Servings 12
- Amount Per Serving
- Calories 350kcal
- % Daily Value *
- Total Fat 22g34%
- Saturated Fat 10g50%
- Trans Fat 0g
- Cholesterol 5mg2%
- Sodium 50mg3%
- Potassium 150mg5%
- Total Carbohydrate 30g10%
- Dietary Fiber 2g8%
- Sugars 24g
- Protein 8g16%
- Vitamin A 5 IU
- Vitamin C 0 mg
- Calcium 2 mg
- Iron 6 mg
- Vitamin D 0 IU
- Vitamin E 2 IU
- Vitamin K 1 mcg
- Thiamin 0 mg
- Riboflavin 0 mg
- Niacin 1 mg
- Vitamin B6 0 mg
- Folate 1 mcg
- Vitamin B12 0 mcg
- Biotin 0 mcg
- Pantothenic Acid 0 mg
- Phosphorus 5 mg
- Iodine 0 mcg
- Magnesium 5 mg
- Zinc 1 mg
- Selenium 1 mcg
- Copper 0 mg
- Manganese 0 mg
- Chromium 0 mcg
- Molybdenum 0 mcg
- Chloride 0 mg
* Percent Daily Values are based on a 2,000 calorie diet. Your daily value may be higher or lower depending on your calorie needs.