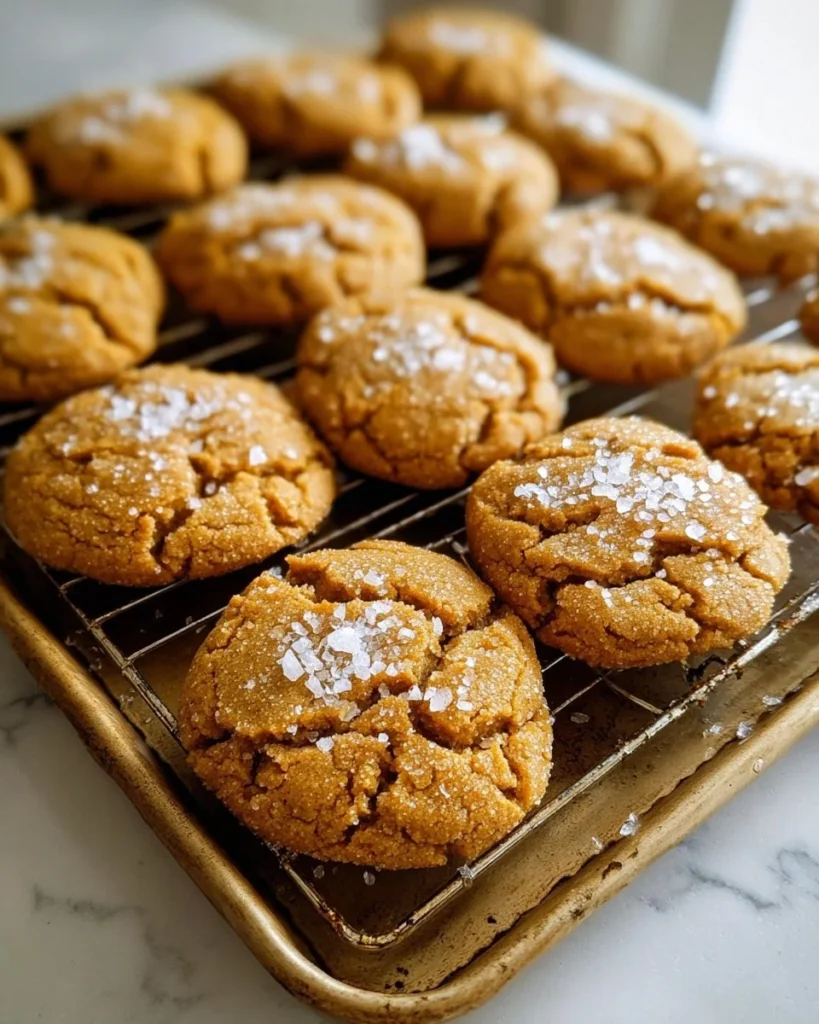
When I think of cookies that effortlessly blend sweet and savory, Salted Honey Cookies immediately come to mind. There’s something incredibly comforting about the warm aroma of freshly baked cookies wafting through the kitchen, making everyone feel at home. I stumbled upon this recipe during one of my late-night baking adventures, and let me tell you, I’ve made it my go-to ever since! Honey adds a lovely depth of flavor that sets these cookies apart, while a sprinkle of sea salt transforms each bite into something magical. Trust me, your taste buds will thank you!
Why you'll love this recipe
So, why should you put on your apron and whip up a batch of these delightful cookies tonight? For starters, the combination of honey and light brown sugar creates a rich, molasses-like sweetness that’s utterly addictive. And let’s not overlook the warm notes of cinnamon gently waking up your senses—it's like wrapping yourself in a cozy blanket!
Moreover, the dough’s chilling time is not just a formality; it modifies the texture and flavor, resulting in cookies that are chewy in the center yet slightly crispy at the edges. Oh, and those little flecks of Fleur de Sel? They contrast beautifully with the sweetness, making each bite an exquisite experience. Plus, these cookies are perfect for sharing—or not. No judgment here if you decide to keep them all to yourself!
Gather these ingredients
Let’s chat about what you'll need to bring this delightful treat to life. Here’s the lineup:
-
½ cup unsalted butter, at room temperature: The heart of any great cookie, butter gives richness and flavor. Room temperature ensures it creams well with the sugars.
-
2 tablespoons oil: A little oil keeps the cookies moist and tender. Plus, it gives you a deeper, more complex flavor profile.
-
1 cup light brown sugar: This sweetener offers that beautiful caramel flavor we all crave in a chewy cookie.
-
¼ cup honey: Pure golden goodness. Honey not only sweetens but also adds a floral note that beautifully elevates the overall flavor.
-
1 large egg: This ingredient binds everything together while lending moisture and richness to the dough.
-
1 teaspoon vanilla extract: A splash of vanilla is like the cherry on top; it deepens the cookie's flavor and rounds it out nicely.
-
2 ¼ cups all-purpose flour: A sturdy base for your cookies. It helps achieve that perfect chewy texture.
-
2 teaspoons baking soda: This is your leavening agent. It’ll help the cookies rise to perfection.
-
½ teaspoon salt: Enhances the flavors and balances the sweetness.
-
1 ½ teaspoons cinnamon: A warm spice that whispers comfort in every bite.
-
Fleur de Sel, for sprinkling: This finishing salt adds a sophisticated touch and enhances that sweet-salty contrast we love.
The cooking process explained
Ready to create some cookie magic? Here’s how to do it step-by-step:
-
In a large bowl (or the bowl of a stand mixer), combine the room temperature butter, oil, light brown sugar, and honey.
-
Using a paddle attachment, mix at medium speed until smooth and consistent—this should take about one minute. We want everything to come together beautifully.
-
Reduce your speed and incorporate the egg along with the vanilla extract until they’re nicely blended. Don't forget to scrape down the sides; it’s key for uniformity!
-
Now, gently add the flour, baking soda, salt, and cinnamon. Stir on low speed just until combined. You want to avoid overmixing—some lumps are okay!
-
Line a baking sheet with parchment paper. Use a large cookie scoop (or spoon) to portion out 3 tablespoon-sized rounds of the dough onto the prepared sheet.
-
Cover the sheet pan and pop it in the fridge for about 1 ½ hours. Trust me, this chilling step is where the magic happens—preventing spreading and enhancing flavor.
-
Preheat your oven to 350°F (175°C). Once the dough is firm, arrange just under half of the chilled cookie dough balls on a second parchment-lined baking sheet.
-
Bake for approximately 10 minutes, or until the edges are set and just starting to brown. Keep an eye on them—they’ll continue to cook a bit as they cool.
-
As soon as they come out of the oven, sprinkle each with a pinch of Fleur de Sel. This step elevates your salty-sweet balance to celestial heights!
-
Allow the cookies to cool on the baking sheet for a few minutes before transferring them to a wire rack. For the best texture and flavor, let them sit a bit before diving in.
-
Repeat the baking process with the remaining dough, and voilà!
Best way to enjoy it
Now that your kitchen smells like a little slice of heaven, how should you enjoy these cookies? For starters, a warm cookie fresh out of the oven is pure bliss, especially paired with a glass of cold milk or a cup of steaming tea. You might even consider serving them up alongside a scoop of vanilla ice cream for the ultimate dessert experience—just imagine it!
Alternatively, package them beautifully in a jar and give them as gifts. Your friends, family, or colleagues will feel extra special, plus you’ll be the star of any gathering.
How to store and freeze
Looking to keep those cookies fresh for a rainy day or to enjoy later? Here’s how to store them properly:
-
Room Temperature: Keep the cookies in an airtight container for up to one week; they’ll stay soft and delicious.
-
Refrigerator: You can extend their life a little longer by refrigerating them, but they might lose some of their unforgettable chewiness.
-
Freezing: Grab some freezer-friendly bags or containers, and they’ll keep well frozen for up to three months. You can also freeze the unbaked dough balls. Just scoop them onto a baking sheet and freeze until solid. Then transfer them to a bag for future cookie cravings! When you’re ready to bake, just add a few extra minutes to the baking time.
Extra tips and advice
While this recipe is pretty foolproof, here are a few pro tips to guarantee success:
-
Use room temperature ingredients! It really does make a difference in texture.
-
Don’t skip the chilling step. It's crucial for preventing spreading and allows the flavors to develop beautifully.
-
Consider toasting your cinnamon briefly in a dry pan before adding it to the dough; it deepens the flavor profile and adds a lovely warmth.
-
If you want a more pronounced honey flavor, feel free to up the amount to ⅓ cup. Just adjust your flour by a tablespoon or two to compensate.
-
Experiment with different toppings: chopped nuts, drizzles of chocolate, or even a sprinkle of quick oats can add delightful twists!
Creative Twists
Why stop at the classic cookie? Here are a few ways to customize:
-
Nutty Delight: Add in chopped walnuts or pecans for a delightful crunch. It adds a new texture and flavor dimension!
-
Spice It Up: Swap the cinnamon for pumpkin pie spice during the colder months for a warm, festive variation.
-
Citrus Zest: A touch of orange or lemon zest can brighten up the sweetness wonderfully.
-
Chocolate Lover's Dream: Add a handful of chocolate chips to the dough—you’ll create a lovely sweet and salty mix that’s downright heavenly.
-
Gluten-Free Option: Swap the all-purpose flour with a 1:1 gluten-free blend.
Your questions answered
How long does it take to prep this recipe?
The prep itself takes about 15-20 minutes, but remember to factor in the chilling time of 1 ½ hours before baking.
Can I make these cookies without the egg?
Absolutely! You can substitute the egg with a flaxseed mixture (1 tablespoon flaxseed meal + 2.5 tablespoons water) for a vegan option. Just let it sit until it thickens.
What if I don’t have Fleur de Sel?
No worries! Regular sea salt or kosher salt works just as well—just use a smaller pinch, as it’s more potent.
Can I use a different type of honey?
Definitely! Each type of honey lends a different flavor, from clover to wildflower. Experiment and see which one you prefer!
How do I know when the cookies are done?
Look for slightly golden edges with a still-soft center. They’ll continue to firm up as they cool!
These Salted Honey Cookies are more than just treats; they’re a celebration of flavors that beckon to be shared. So, roll up your sleeves, enjoy the process, and don't hesitate to sprinkle in your own creativity! Once you take that first bite and taste the delightful melange of sweet and salty, I assure you, you won’t be able to resist making this recipe a staple in your baking repertoire. I can’t wait to hear how yours turn out! Come back and share your experiences with me. Happy baking, friend!