I have a little secret to share with you today, and trust me, you’re going to love it. You know those weekends when the smell of freshly toasted English muffins makes your whole morning feel brighter? Well, I’ve found a way to capture that magic right at home, using just a 1/2 cup of sourdough discard! If you’ve ever been at a loss on what to do with that leftover starter, this recipe transforms it into delightful, tangy English muffins that are golden on the outside and soft on the inside. It’s a glorious way to minimize waste and maximize flavor!
Why you’ll love this recipe
Picture this: you wake up on a Saturday morning, the sun streaming through your kitchen windows, and you have the tantalizing aroma of freshly made English muffins wafting through the air. It’s not just about the taste; it’s about the experience. Making these sourdough discard English muffins is quick and easy—perfect for any baking novice or seasoned chef. You’ll not only impress your friends with your culinary prowess but also indulge in a tasty treat that’s bursting with flavor.
With that tanginess from the sourdough and a hint of sweetness from honey, these muffins elevate your breakfast game like no other. What makes it special? You’re using what you already have on hand—no need for store-bought alternatives! Trust me, these beauties are the perfect base for a hearty breakfast sandwich, slathered in butter, or simply toasted with jam.
Gather these ingredients
To create these golden pockets of goodness, you’ll need:
-
1/2 cup sourdough discard: This is the star of our show! That leftover starter brings such a lovely tang and flavor to the muffins. If you don’t have any discard on hand, you can whip up a quick batch of sourdough starter, but I promise you, using what you already have is the way to go.
-
2 1/2 cups all-purpose flour: A pantry staple that helps create the structure of your muffins. If you’re feeling adventurous, you can swap part of this for whole wheat flour for added depth.
-
1 tablespoon honey: This little drizzle of love adds a touch of sweetness that balances out the tanginess of the sourdough. Maple syrup could also work if you’re looking for a swap.
-
1 teaspoon salt: Essential for enhancing flavors. It’s amazing how salt can lift a dish and bring all the elements together.
-
1 teaspoon baking soda: This will give your muffins the lift they need. Just a pinch, really, but it works like magic!
-
1 cup water (adjust as needed): Start with a cup, but keep your eye on the dough as you mix. It should be soft but not too sticky.
-
Neutral oil or butter for greasing: A little grease makes all the difference during cooking, ensuring those muffins have a beautiful golden crust.
The cooking process explained
-
In a large bowl, combine the flour, salt, and baking soda. Whisk it all together so those dry ingredients can mingle.
-
Next, add in the sourdough discard, honey, and water. Stir gently until a soft dough forms. You might want to start with less water and add more gradually—trust me, you can always hydrate, but dry is a bummer!
-
Knead the dough for about 2–3 minutes. Just enough to bring it all together. Kneading is like a love language for your dough!
-
Let it rest for 10 minutes. It’s like taking a little break before the big show.
-
Roll out the dough to about ½ inch thickness. Now comes the fun part! Use a biscuit cutter to cut out rounds, like little doughy discs of happiness.
-
Preheat a cast-iron skillet over medium-low heat. A well-heated skillet gives you that nice, even cook, so be patient! Lightly grease it and get ready to cook.
-
Cook each muffin for 5–6 minutes on each side. You’ll know they’re ready when they look golden and make a delightful sound when you tap them. Adjust the heat as necessary; we don’t want them burned!
-
If they still feel a bit doughy in the center, pop them in a 350°F oven for 5 minutes. Envision those lovely muffins baking away!
-
Cool completely on a wire rack. Once they’ve cooled, they’re ready for your favorite toppings.
Best way to enjoy it
These beautiful muffins are best enjoyed toasted. Just imagine, the insides are perfect for soaking up butter, while the outside gives you that satisfying crunch. You can serve them plain, or top them with jam, cream cheese, or even smashed avocado. Craving a hearty breakfast? Fill them with eggs and bacon for an epic start to your day. And if you’re feeling fancy, sprinkle some herbs or spices into the dough to give them an extra flair.
Storage and reheating tips
If you find yourself with leftovers—though I doubt it—you can keep them fresh by storing them in an airtight container at room temperature for up to three days. If you want to extend their life a little longer, pop them into the freezer. Stash them away in a zip-top bag, and they’ll be happy for up to a month. To reheat, you can place them right in a toaster or pan for a delicious warmed-up treat.
Pro chef tips
Here’s the scoop from my kitchen to yours: don’t skip the resting step after kneading! It allows the gluten to relax and makes rolling out the dough a breeze. Also, feel free to taste a little bit of the raw dough (it’s harmless but oh-so-satisfying). If things are looking a bit sticky, don’t panic—just dust the work surface with a little flour to make it manageable.
Creative Twists
Feel like mixing things up? Add herbs like rosemary or thyme into the dough for a savory spin. You could even fold in some shredded cheese before rolling it out. Fancy a sweeter version? Toss in some chocolate chips or blueberries! These muffins are like a blank canvas, waiting for your culinary creativity.
FAQs
Q: How long does it take to make these muffins?
A: From start to finish, you’re looking at about an hour, including resting time. Totally worth the wait!
Q: Can I use gluten-free flour?
A: Yes, but be sure to use a blend designed for baking. They might not be quite as fluffy as the original, but they’ll still be delicious!
Q: What if my dough is too dry?
A: Just add a tablespoon of water at a time until you reach that lovely soft dough texture. No need for a dough disaster!
Q: Can I make these ahead of time?
A: Absolutely! You can prep the dough and store it in the fridge overnight before rolling and cooking.
Q: What’s the best way to serve them?
A: Toasted, with an array of toppings—think butter, jam, eggs, or even a breakfast sandwich!
There’s something truly rewarding about taking simple ingredients and crafting them into something utterly delicious. Whether you’re breakfasting alone or hosting friends, these sourdough discard English muffins will elevate your mornings. I can’t wait for you to try them! Get creative, enjoy the process, and don’t forget to drop by and share your experiences. Happy baking!
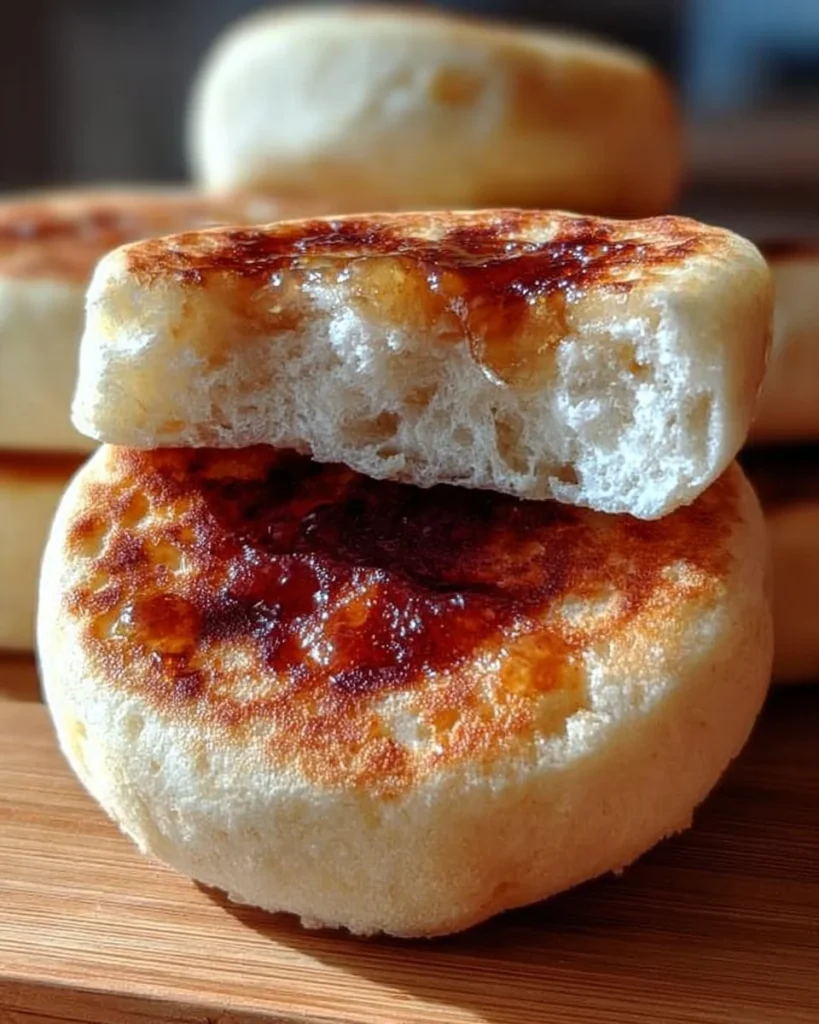

Sourdough Discard English Muffins – Easy, Tangy, Golden Perfection
Description
Transform your sourdough discard into golden, fluffy English muffins that are perfect for breakfast or any time of the day.Ingredients
Muffin Ingredients
Instructions
Preparation
-
Mix Dry Ingredients
In a large bowl, combine flour, salt, and baking soda. Whisk to combine. -
Combine Wet Ingredients
Add sourdough discard, honey, and water. Stir gently until a soft dough forms.Start with less water and add gradually. -
Knead Dough
Knead the dough for 2–3 minutes until combined.Kneading helps develop gluten. -
Let Dough Rest
Cover the dough and let it rest for 10 minutes.This allows the gluten to relax. -
Cut Muffins
Roll out to about ½ inch thickness and cut with a biscuit cutter. -
Cook Muffins
Preheat a cast-iron skillet on medium-low heat. Lightly grease it and cook each muffin for 5-6 minutes on each side.If still doughy, bake at 350 F for 5 minutes. -
Cool Muffins
Cool completely on a wire rack before serving.Best enjoyed toasted with toppings.
Nutrition Facts
Servings 4
- Amount Per Serving
- Calories 150kcal
- % Daily Value *
- Total Fat 3g5%
- Saturated Fat 1g5%
- Trans Fat 0g
- Cholesterol 0mg
- Sodium 200mg9%
- Potassium 80mg3%
- Total Carbohydrate 25g9%
- Dietary Fiber 1g4%
- Sugars 1g
- Protein 4g8%
- Vitamin A 0 IU
- Vitamin C 0 mg
- Calcium 20 mg
- Iron 1 mg
- Vitamin D 0 IU
- Vitamin E 0 IU
- Vitamin K 0 mcg
- Thiamin 0.1 mg
- Riboflavin 0.1 mg
- Niacin 1 mg
- Vitamin B6 0.1 mg
- Folate 15 mcg
- Vitamin B12 0 mcg
- Biotin 0 mcg
- Pantothenic Acid 0.1 mg
- Phosphorus 20 mg
- Iodine 0 mcg
- Magnesium 10 mg
- Zinc 1 mg
- Selenium 0 mcg
- Copper 0.1 mg
- Manganese 0.2 mg
- Chromium 0 mcg
- Molybdenum 0 mcg
- Chloride 0 mg
* Percent Daily Values are based on a 2,000 calorie diet. Your daily value may be higher or lower depending on your calorie needs.