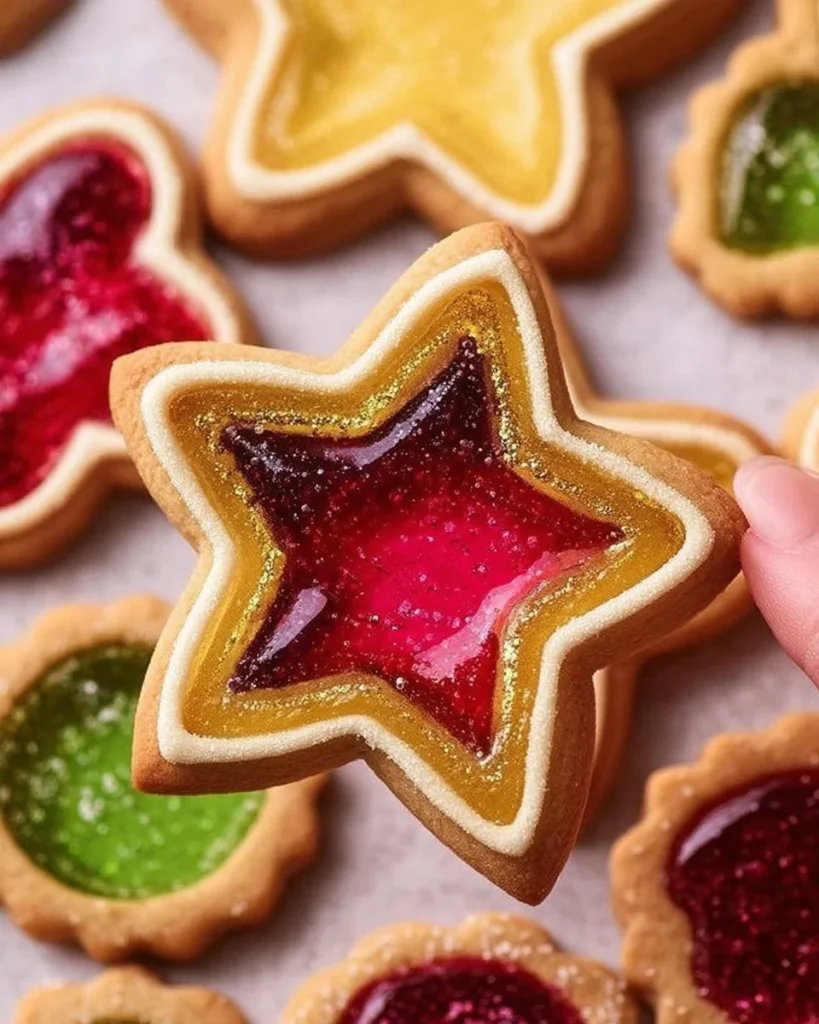
Ah, stained glass cookies! They’re like little bursts of joy with a kaleidoscope of color and sweetness trapped in a buttery, tender shell. I remember the first time I laid eyes on these beauties at a holiday bake sale. I was entranced, and you know what? The moment I tried one, I was hooked! It’s not just the stunning visual that lures you in; it's the delightful crunch that gives way to the chewy center. Whether for a festive gathering or a mid-week pick-me-up, these cookies are always a hit.
Reasons to Try It
You might be wondering, why bother making stained glass cookies? Well, let me tell you, they bring a certain magic to any occasion. The striking colors from the melted candy in the centers not only create a beautiful presentation but also a delightful play of sweet and tart flavors with every bite. Imagine biting into a cookie that has the crunch of a buttery biscuit paired with the vibrant taste of a Jolly Rancher—it’s a sweet symphony! Plus, they’re incredibly versatile. You can swap shapes based on the season or occasion, making them a go-to for birthdays, holidays, or just a fun afternoon baking session!
And did I mention the fun of making them? It’s a recipe that sparks joy—perfect for kids and adults alike. Sharing this experience while baking together adds an extra layer of sweetness.
Gather These Ingredients
Let's talk ingredients—these are the building blocks of your cookie masterpiece!
- Unsalted Butter (1 cup, softened): Use the good stuff! It gives your cookies that rich, creamy flavor. If you're in a pinch, feel free to substitute with margarine, but don't blame me if it’s not quite the same!
- Granulated Sugar (1 cup): This is your sweetener, and it helps achieve that delightful crispy edge. Confectioners' sugar can also work, but you’ll lose some texture.
- Large Egg (1): The binder that holds everything together. You can swap it for a flax egg if you're going vegan.
- Vanilla Extract (1 teaspoon): A classic flavor booster. If you’re feeling adventurous, almond extract could add an exciting twist!
- All-Purpose Flour (3 cups): The backbone of your cookie dough. For a gluten-free option, consider using a blend of gluten-free flour to keep the texture intact.
- Salt (1/2 teaspoon): Enhances all the sweet flavors, creating that perfect balance. Sea salt can also add a delightful complexity.
- Crushed Jolly Ranchers (1 cup): These are the show-stoppers. You can play with flavors (I love watermelon and blue raspberry!) to customize your cookies. If Jolly Ranchers aren’t available, any hard candy that melts well can be a substitute.
How This Recipe Comes Together
Ready to embark on this colorful baking journey? Here’s how to whip up these beauties step-by-step. Grab your favorite apron and let’s get started!
- Preheat your oven to 350°F (175°C) and line a baking sheet with parchment paper.
- Cream Together the softened butter and granulated sugar in a large bowl until the mixture is light and fluffy. This should take about 3–5 minutes. Trust me—this step is where the magic begins.
- Beat In the egg and vanilla extract until everything is combined beautifully.
- Gradually Add the all-purpose flour and salt. Mix until a deliciously soft dough forms. Don’t get too crazy here; just enough mixing to combine everything will do.
- Divide the Dough in half and roll out each half between two sheets of parchment paper to about 1/4 inch thick, ensuring an even thickness for uniform baking.
- Cut Out Shapes with your favorite cookie cutters, transferring them to the prepared baking sheet. Think stars for the holidays or hearts for love!
- Create the Windows by using a smaller cookie cutter to cut out the centers of your shapes. Don’t waste that dough—save the scraps for another cookie batch!
- Fill each center with your crushed Jolly Ranchers. Make sure not to overfill; they do expand while baking!
- Bake in your preheated oven for about 10-12 minutes, or until the edges turn golden brown and the Jolly Ranchers have melted into a beautiful ‘glass’ center.
- Cool Completely on the baking sheet before transferring them to a cooling rack. Patience here is key; you don’t want a sticky disaster on your hands!
Best Way to Enjoy It
These stained glass cookies are delightful on their own, but let’s talk pairing. A warm cup of tea or coffee is always a winner! Alternatively, if you have little ones running around, a cold glass of milk is the classic choice.
You can even get creative with the presentation. Arrange them on a colorful platter, sprinkle some powdered sugar on top for that stunning snowy effect, or drizzle with a simple icing for extra flair.
Keeping Leftovers Fresh
If you happen to have any cookies left (which is rare, if I’m honest!), store them in an airtight container at room temperature. They should stay fresh for about a week. If you're feeling wise and want to make a batch ahead of time, these cookies freeze splendidly! Just layer them between parchment paper in a freezer bag.
Pro Chef Tips
Here’s where I drop some wisdom! First off, don’t rush the creaming process—let that butter and sugar blend work its magic for a light texture. Secondly, if you want the dough to be easier to roll, chill it in the fridge for about 30 minutes before rolling.
If your Jolly Ranchers are stuck together, a quick spin in the microwave can soften them just enough for crushing. And lastly, a pinch of lemon zest in the dough can add a lovely depth to the flavors—just try it and see!
Recipe Variations
Feeling adventurous? You can swap Jolly Ranchers with other hard candies like Skittles or Lifesavers for different flavor profiles. If you want to add a seasonal twist, try adding a hint of cinnamon for a fall vibe or peppermint for winter holidays.
Can’t get enough of unique flavors? A dash of almond or hazelnut extract can elevate the flavor profile. The sky is truly the limit here!
Ingredients List
- 1 cup unsalted butter, softened
- 1 cup granulated sugar
- 1 large egg
- 1 teaspoon vanilla extract
- 3 cups all-purpose flour
- 1/2 teaspoon salt
- 1 cup crushed Jolly Ranchers
Directions to Follow
- Preheat your oven to 350°F (175°C) and line a baking sheet with parchment paper.
- Cream butter and sugar until light and fluffy.
- Beat in the egg and vanilla extract until everything is combined.
- Gradually mix in flour and salt until a dough forms.
- Divide and roll out each dough half to 1/4 inch thick.
- Cut out shapes and transfer them to the baking sheet.
- Cut small centers and fill with crushed Jolly Ranchers.
- Bake for 10-12 minutes until edges are golden.
- Cool completely before removing from the sheet.
Your Questions Answered
- Can I make these cookies in advance? Absolutely! They can be made a week ahead and stored in an airtight container.
- What can I use instead of Jolly Ranchers? Any hard candies that melt well work, but avoid those with fillings.
- Is the dough supposed to be sticky? No! If it feels sticky, consider flouring your surface or chilling the dough.
- How can I decorate my cookies? A drizzle of icing or some colored sugar sprinkles can add flair.
- Can I freeze the cookie dough? Definitely! Shape the dough into disks, wrap tightly in plastic, and freeze for up to 3 months.
Baking stained glass cookies is not just a culinary craft; it’s an artistic endeavor that can bring warmth and joy to your kitchen. So, slip on that apron, crank up your favorite playlist, and start baking! These cookies are waiting to be crafted, and remember, the kitchen is a place of joy and creativity. Feel free to share your experiences in the comments below; I can’t wait to hear how your stained glass creations turn out!


